gentoo-on-rpi-64bit
Bootable 64-bit Gentoo image for the Raspberry Pi 4 Model B, and Pi 3 B and B+, with Linux 5.4, OpenRC, Xfce4, VC4/V3D, camera & h/w codec support, profile 17.0, weekly-autobuild binhost
30 Oct 2020: sadly, due to legal obligations arising from a recent change in my ‘real world’ job, I must announce I am standing down as maintainer of this project with immediate effect. For the meantime, I will leave the repo up (for historical interest, and since the images may be of use still in certain applications); however, there will be no further updates to the underlying binhost etc., nor will I be accepting / actioning further pull requests or bug reports from this point. Email requests for support will also have to be politely declined, so, please treat this as an effective EOL notice.
For further details, please see my post here.
Gentoo itself on the aarch64 / 64-bit RPi platform remains very much a going concern of course; please see e.g. this forum for more details.
With sincere apologies, sakaki ><
Description

This project is a bootable, microSD card 64-bit Gentoo image for the Raspberry Pi 4 model B,
3 model B and 3 model B+ single board computers (SBC).
The image’s userland contains a complete (OpenRC-based) Gentoo system (including a full Portage tree) - so you can run emerge operations immediately - and has been pre-populated with a reasonable package set (Xfce v4.14, LibreOffice v6.4.4.2, Firefox Quantum v77.0.1, Chromium v84.0.4147.30, Thunderbird v68.9.0, VLC v3.0.10-r1, Kodi v18.7.1, GIMP v2.10.18-r1 etc.) so that you can get productive without having to compile anything first! Unless you want to, of course; this being Gentoo, GCC v10.1.0, Clang v10.0.0, IcedTea v3.16.0 (OpenJDK 8), Go v1.14.4, Rust v1.44.0 and various versions of Python are of course bundled also ^-^ As of version 1.2.0 of the image, all userland software has been built under Gentoo’s 17.0 profile, and, as of version 1.5.0 of the image, the new RPi4 Model B is also supported (and to reflect this, the project itself has been renamed, from gentoo-on-rpi3-64bit to gentoo-on-rpi-64bit ^-^).
The kernel and userland are both 64-bit (arm64/aarch64), and support for the Pi’s VC4 GPU (VC6 on the Pi4) has been included (using vc4-fkms-v3d / Mesa), so rendering performance is reasonable (e.g., glxgears between 400 and 1200fps, depending on load and system type; real-time video playback). The Pi’s onboard Ethernet, WiFi (dual-band on the RPi3 B+ / Pi4 B) and Bluetooth adaptors are supported, as is the official 7" touchscreen (if you have one). Sound works too, both via HDMI (given an appropriate display), and the onboard headphone jack. As of version 1.1.0 of the image, a weekly-autobuild binhost, custom Gentoo profile, and binary kernel package have been provided, making it relatively painless to keep your system up-to-date (and, because of this, genup has been configured to run automatically once per week, by default). As of version 1.4.0 of the image, access to the RPi3’s hardware video codecs (and camera module, if you have one) is supported too, via the V4L2 framework, and, as of version 1.5.0, these features are available on the RPi4 also. Additionally, on the RPi4, the use of dual monitors is supported (but not required) as of version 1.5.0 (as is accelerated graphics, via V3D / Mesa). And, there is no 3GiB ‘memory ceiling’ anymore: if you are fortunate enough to own a 8GiB Pi4, all 8GiB of that RAM is usable. As of 1.5.2, 64-bit MMAL userland is supported (and used by bundled tools like raspivid), as is automated update of the RPi4’s onboard EEPROM firmware. And finally, as of 1.6.0, rpi-5.4.y kernels are supported, the FOSS Jitsi videoconferencing server is bundled, and elogind is used in place of consolekit.
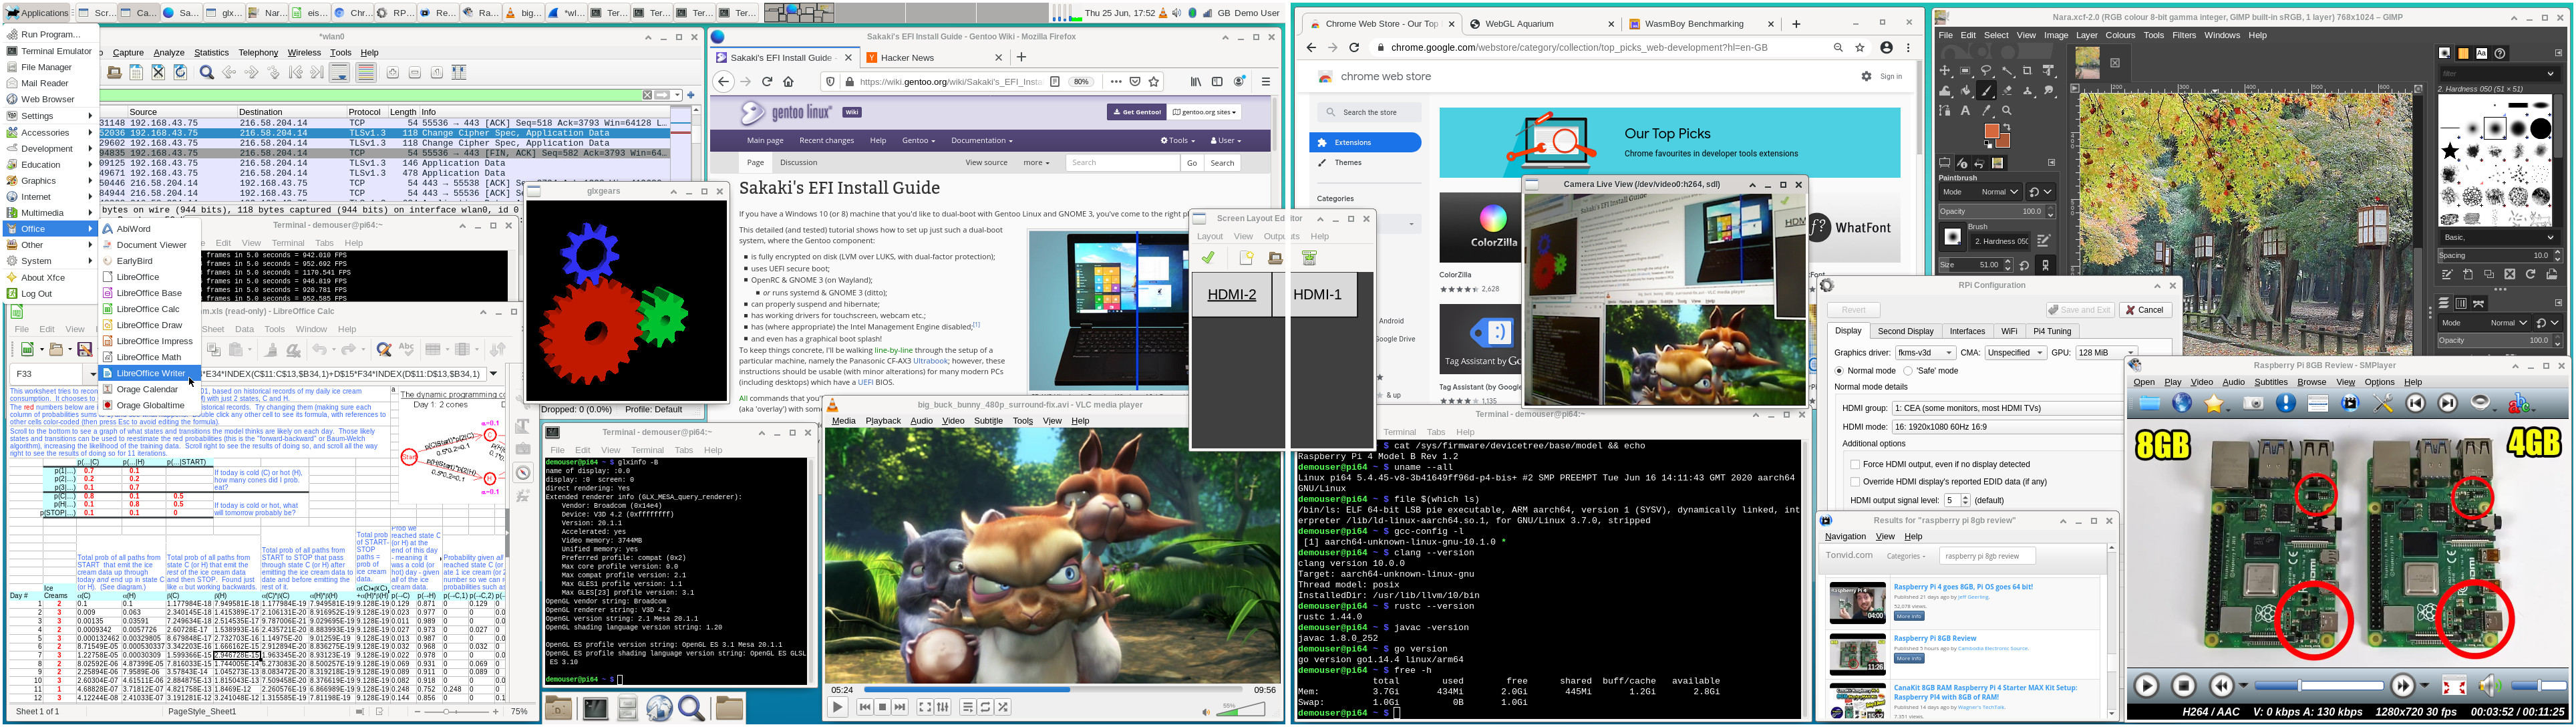
Here’s a screenshot of the image running on a dual-display RPi4 B (click to show a higher resolution view):

The image may be downloaded from the link below (or via wget, per the instructions which follow).
NB: most users will want the first, full image (genpi64.img.xz) - the ‘lite’ variant (genpi64lite.img.xz) boots to a command-line (rather than a graphical desktop), and is intended only for experienced Gentoo users (who wish to to e.g. set up a server).
The previous release versions are still available (together with a detailed changelog) here. If you have a significant amount of work invested in an older release of this image, I have also provided manual upgrade instructions (from 1.0.0 thru 1.5.4 → 1.6.0) here.
Please read the instructions below before proceeding. Also please note that all images (and binary packages) are provided ‘as is’ and without warranty. You should also be comfortable with the (at the moment, unavoidable) non-free licenses required by the firmware and boot software supplied on the image before proceeding: these may be reviewed here.
It is sensible to install Gentoo to a separate microSD card from that used by your default Raspbian system; that way, when you are finished using Gentoo, you can simply power off, swap back to your old card, reboot, and your original system will be just as it was.
Please also note that support for arm64 is still in its early stages with Gentoo, so it is quite possible that you may encounter strange bugs etc. when running a 64-bit image such as this one. A lot of packages have been * ~* keyworded to get the system provided here to build… but hey, if you like Gentoo, little things like that aren’t likely to put you off ^-^
Table of Contents
Prerequisites
To try this out, you will need:
-
For the full image (which most users will want), a microSD card of at least 16GB capacity (as this image is 1,961MiB compressed, 12.25GiB == 13.15GB uncompressed, so it should fit on any card marked as >= 16GB). For the ‘lite’ image, a card marked as >= 8GB should suffice (as this image is 755MiB compressed, 7.25GiB == 7.78GB uncompressed). If you intend to build many additional large packages (or kernels) on your RPi, a card of >16GB is recommended (the root partition will automatically be expanded to fill the available space on your microSD card, on first boot). Depending on the slots available on your PC, you may also need an adaptor to allow the microSD card to be plugged in (to write the image to it initially). Class A1 cards are particularly recommended, but not required.
I have found most SanDisk cards work fine; if you are having trouble, a good sanity check is to try writing the standard Raspbian 32-bit image to your card, to verify that your Pi4 (or Pi3) will boot with it, before proceeding.
-
A Raspberry Pi 4 Model B, or Pi 3 Model B or B+ (obviously!).
For simplicity, I am going to assume that you will be logging into the image (at least initially) via an (HDMI) screen and (USB) keyboard connected directly to your Pi, rather than e.g. via ssh (although, for completeness, it is possible to ssh in via the Ethernet interface (which has a DHCP client running), if you can determine the allocated IP address, for example from your router, or via nmap).
A decent power supply is recommended.
-
A PC to decompress the image and write it to the microSD card. This is most easily done on a Linux machine of some sort, but it is straightforward on a Windows or Mac box too (for example, by using Etcher, which is a nice, all-in-one cross-platform graphical tool for exactly this purpose - it’s free and open-source; or, bzt’s usbimager, a very lightweight cross-platform open source image writer). In the instructions below I’m going to assume you’re using Linux.
It is possible to use your Raspberry Pi for this task too, if you have an external card reader attached, or if you have your root on e.g. USB (and take care to unmount your existing /boot directory before removing the original microSD card), or are booted directly from USB. Most users will find it simplest to write the image on a PC, however.
Downloading and Writing the Image
Choose either the full (recommended for most users) or ‘lite’ (command-line only) variant, then follow the appropriate instructions below (full or lite).
If you are using a Windows or Mac box, or prefer to use a GUI tool in Linux, I recommend you download your preferred image via your web browser using the links above, and then check out either of the the free, open-source, cross-platform tools Etcher or usbimager to write it to microSD card. Then, once you’ve done that, continue reading at “Booting!” below.
Alternatively, for those who prefer the Raspberry Pi NOOBS installer GUI, both images are now available for installation using PINN (called gentoo64 and gentoo64lite there). PINN is a fork of NOOBS and includes a number of additional advanced features. Please see this post for further details. Many thanks to procount for his work on this.
Full Image (genpi64.img.xz)
On your Linux box, issue (you may need to be root, or use sudo, for the following, hence the ‘#’ prompt):
# wget -c https://github.com/sakaki-/gentoo-on-rpi-64bit/releases/download/v1.6.0/genpi64.img.xz
# wget -c https://github.com/sakaki-/gentoo-on-rpi-64bit/releases/download/v1.6.0/genpi64.img.xz.asc

to fetch the compressed disk image file (~1,961MiB) and its signature.
Next, if you like, verify the image using gpg (this step is optional):
# gpg --keyserver hkp://ipv4.pool.sks-keyservers.net:80 --recv-key DDE76CEA
# gpg --verify genpi64.img.xz.asc genpi64.img.xz
Assuming that reports ‘Good signature’, you can proceed. (Warnings that the key is “not certified with a trusted signature” are normal and may be ignored.)
Next, insert (into your Linux box) the microSD card on which you want to install the image, and determine its device path (this will be something like /dev/sdb, /dev/sdc etc. (if you have a USB microSD card reader), or perhaps something like /dev/mmcblk0 (if you have e.g. a PCI-based reader); in any case, the actual path will depend on your system - you can use the lsblk tool to help you). Unmount any existing partitions of the card that may have automounted (using umount). Then issue:
Warning - this will destroy all existing data on the target drive, so please double-check that you have the path correct! As mentioned, it is wise to use a spare microSD card as your target, keeping your existing Raspbian microSD card in a safe place; that way, you can easily reboot back into your existing Raspbian system, simply by swapping back to your old card.
# xzcat genpi64.img.xz > /dev/sdX && sync
Substitute the actual microSD card device path, for example /dev/sdc, for /dev/sdX in the above command. Make sure to reference the device, not a partition within it (so e.g., /dev/sdc and not /dev/sdc1; /dev/sdd and not /dev/sdd1 etc.)
If, on your system, the microSD card showed up with a path of form /dev/mmcblk0 instead, then use this as the target, in place of /dev/sdX. For this naming format, the trailing digit is part of the drive name (partitions are labelled as e.g. /dev/mmcblk0p1, /dev/mmcblk0p2 etc.). So, for example, you might need to use xzcat genpi64.img.xz > /dev/mmcblk0 && sync.
The above xzcat to the microSD card will take some time, due to the decompression (it takes between 5 and 25 minutes on my machine, depending on the microSD card used). It should exit cleanly when done - if you get a message saying ‘No space left on device’, then your card is too small for the image, and you should try again with a larger capacity one.
Note that on first boot, the image will automatically attempt to resize its root partition (which, in this image, includes /home) to fill all remaining free space on the microSD card, by running this startup service; if you do not want this to happen (for example, because you wish to add extra partitions to the microSD card later yourself), then simply rename the (empty) sentinel file autoexpand_root_partition (in the top level directory of the vfat filesystem on the first partition of the microSD card) to autoexpand_root_none, before attempting to boot the image for the first time.
Now continue reading at “Booting!” below.
Lite Image (genpi64lite.img.xz)
Please note: this image boots to a command line, not a GUI, and is only suitable for experienced Gentoo users. If unsure, choose the full image above, instead.
On your Linux box, issue (you may need to be root, or use sudo, for the following, hence the ‘#’ prompt):
# wget -c https://github.com/sakaki-/gentoo-on-rpi-64bit/releases/download/v1.6.0/genpi64lite.img.xz
# wget -c https://github.com/sakaki-/gentoo-on-rpi-64bit/releases/download/v1.6.0/genpi64lite.img.xz.asc

to fetch the compressed disk image file (~755MiB) and its signature.
Next, if you like, verify the image using gpg (this step is optional):
# gpg --keyserver hkp://ipv4.pool.sks-keyservers.net:80 --recv-key DDE76CEA
# gpg --verify genpi64lite.img.xz.asc genpi64lite.img.xz
Assuming that reports ‘Good signature’, you can proceed. (Warnings that the key is “not certified with a trusted signature” are normal and may be ignored.)
Next, insert (into your Linux box) the microSD card on which you want to install the image, and determine its device path (this will be something like /dev/sdb, /dev/sdc etc. (if you have a USB microSD card reader), or perhaps something like /dev/mmcblk0 (if you have e.g. a PCI-based reader); in any case, the actual path will depend on your system - you can use the lsblk tool to help you). Unmount any existing partitions of the card that may have automounted (using umount). Then issue:
Warning - this will destroy all existing data on the target drive, so please double-check that you have the path correct! As mentioned, it is wise to use a spare microSD card as your target, keeping your existing Raspbian microSD card in a safe place; that way, you can easily reboot back into your existing Raspbian system, simply by swapping back to your old card.
# xzcat genpi64lite.img.xz > /dev/sdX && sync
Substitute the actual microSD card device path, for example /dev/sdc, for /dev/sdX in the above command. Make sure to reference the device, not a partition within it (so e.g., /dev/sdc and not /dev/sdc1; /dev/sdd and not /dev/sdd1 etc.)
If, on your system, the microSD card showed up with a path of form /dev/mmcblk0 instead, then use this as the target, in place of /dev/sdX. For this naming format, the trailing digit is part of the drive name (partitions are labelled as e.g. /dev/mmcblk0p1, /dev/mmcblk0p2 etc.). So, for example, you might need to use xzcat genpi64lite.img.xz > /dev/mmcblk0 && sync.
The above xzcat to the microSD card will take some time, due to the decompression (it takes between 5 and 10 minutes on my machine, depending on the microSD card used). It should exit cleanly when done - if you get a message saying ‘No space left on device’, then your card is too small for the image, and you should try again with a larger capacity one.
Note that on first boot, the image will automatically attempt to resize its root partition (which, in this image, includes /home) to fill all remaining free space on the microSD card, by running this startup service; if you do not want this to happen (for example, because you wish to add extra partitions to the microSD card later yourself), then simply rename the (empty) sentinel file autoexpand_root_partition (in the top level directory of the vfat filesystem on the first partition of the microSD card) to autoexpand_root_none, before attempting to boot the image for the first time.
Now continue reading at “Booting!”, immediately below. Note, however, that in the case of this ‘lite’ image, after the startup / resize process has completed, you will be landed at a console login prompt (although it is simple enough to parlay to a basic X11 desktop if you wish). The login credentials are the same as for the full image, viz.:
- default user demouser, password raspberrypi64;
- root user password also raspberrypi64.
Hint: you can use the bundled tool nmtui to easily establish a WiFi network connection from the command line.
Hint: if you wish to use your RPi3/4 in a headless context, as of v1.5.2 of the image you can edit the file startup.sh on the first partition, to e.g. set up fixed network IP addresses, specify WiFi login passphrases etc. The file can be edited on any PC (since the first partition is formatted FAT) and you need to make any changes prior to first boot. The shipped startup.sh contains a number of (commented) examples to help get you oriented. Users booting the image on a system with attached mouse, keyboard and monitor can ignore this facility of course, since networking can be configured via the GUI, once booted.
Booting!
Begin with your RPi4 (or RPi3) powered off. Remove the current (Raspbian or other) microSD card from the board (if fitted), and store it somewhere safe.
Next, insert the (Gentoo) microSD card you just wrote the image to into the Pi. Ensure you have peripherals connected (with the main display plugged into the HDMI0 port - the one nearer the USB-C power connector - if using an RPi4), and apply power.
You should see the Pi’s standard ‘rainbow square’ on-screen for about 2 seconds, then the display will go blank for about 10 seconds, and then (once the graphics driver has loaded) a text console will appear, showing OpenRC starting up. On this first boot (unless you have renamed the sentinel file autoexpand_root_partition in the microSD card’s first partition to autoexpand_root_none), the system will, after a further 10 seconds or so, automatically resize the root partition to fill all remaining free space on the drive, and, having done this, reboot (to allow the kernel to see the new partition table). You should then see the ‘rainbow square’ startup sequence once more, and then the system will resize its root filesystem, to fill the newly enlarged partition. Once this is done, it will launch a standard Xfce desktop, logged in automatically to the pre-created demouser account. A simple configuration application will also be autostarted; this allows you to e.g. change screen resolution, if required:
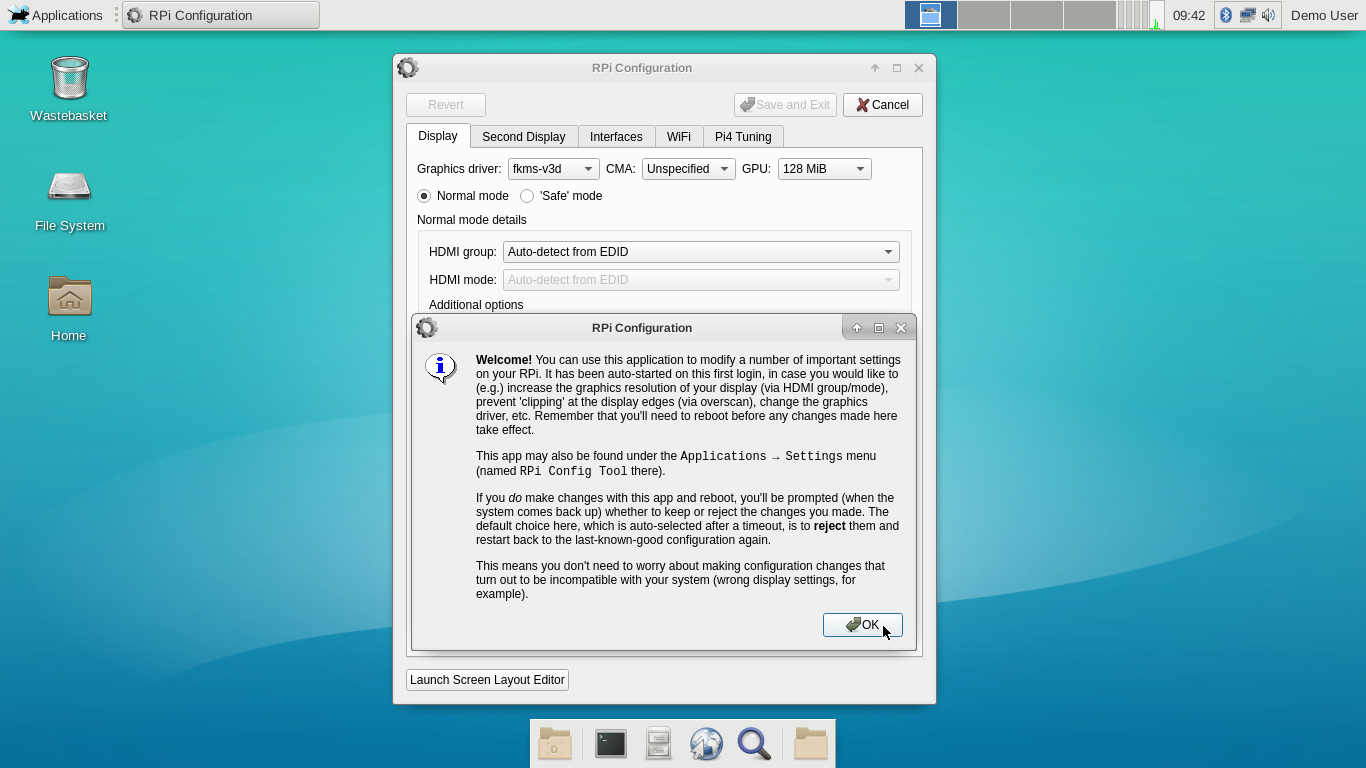
If your display looks OK, there’s no need to make any changes immediately - just click OK to dismiss the welcome dialog, and then click on the Cancel button to close out the configuration tool itself.
The whole process (from first power on to graphical desktop) should take less than three minutes or so (on subsequent reboots, the resizing process will not run, so startup will be a lot faster).
The initial root password on the image is raspberrypi64. The password for demouser is also raspberrypi64 (you may need this if e.g. the screen lock comes on; you can also do sudo su --login root to get a root prompt at the terminal, without requiring a password). These passwords are set by the autoexpand-root startup service. Note that the screensaver for demouser has been disabled by default on the image.
NB - if your connected computer monitor or TV output appears flickering or distorted, you may need to change the settings in the file config.txt, located in the microSD card’s first partition (this partition is formatted vfat so you should be able to edit it on any PC; alternatively, when booted into the image, it is available at /boot/config.txt). Any changes made take effect on the next restart. For an explanation of the various options available in config.txt, please see these notes (the shipped defaults should work fine for most users, however). As of v1.3.1 of this image, you can also use the bundled GUI tool (shown in the screenshot above) to modify (some of) these settings. The program, pyconfig_gen, is, as noted, automatically started on first login, and is available under Applications→Settings→RPi Config Tool.
If the edges of the desktop appear “clipped” by your display (this mostly happens when using HDMI TVs), issue sudo mousepad /boot/config.txt, comment out the line disable_overscan=1 (so it reads instead #disable_overscan=1), save the file, and then reboot (from v1.3.1, you can also enable and configure overscan via the Rpi Config Tool, as noted above). Please note that with modern boot firmware, overscan is ignored if a DMT mode is set.
Tip: if you’d like to set up a persistent dual-monitor setup on an RPi4, please see my short tutorial on this project’s open wiki here (this also contains useful hints for setting up a single display).
Using Gentoo
The supplied image contains a fully-configured ~arm64 Gentoo system (not simply a minimal install or stage 3), with a complete Portage tree already downloaded, so you can immediately perform emerge operations etc. Be aware that, as shipped, it uses UK locale settings, keyboard mapping, timezone and WiFi regulatory domain; however, these are easily changed if desired. See the Gentoo Handbook (here and here) for details on the first three; to customize the WiFi regulatory domain, start the Applications→Settings→RPi Config Tool app, select the WiFi tab, choose your location from the drop-down, click Save and Exit, and reboot when prompted.
Please note that for non-UK keyboards, prior to v1.5.4 of the image, you will also need to edit the file /etc/X11/xorg.conf.d/00-keyboard.conf and replace gb in the line Option "XkbLayout" "gb" with the appropriate code from this list. Leave the rest of the file as-is, save, then reboot for the change to take effect. You will need to be the root user, or use sudo to edit this file (e.g., type sudo mousepad /etc/X11/xorg.conf.d/00-keyboard.conf in a terminal). From v1.5.4 however, a simpler GUI-driven method is available. Simply click Applications→Settings→Keyboard, select the Layout tab, ensure Use system defaults is unchecked, and then, in the Keyboard layout section, click on Add to insert the layouts you need to use. For example, the image has English (UK) and English (US) selected, but you should obviously choose whatever works for you. Do not add more than four layouts (or the switcher plugin will not work correctly). You can use the arrow keys to re-order the list (if you have more than one layout); the one at the top will be the default activated at login time. Once done, click on Close to dismiss the dialog. You should now find that you can switch layouts (if you have specified more than one) either by clicking on the top panel-bar keyboard plugin (the one next to the Demo User text on the far right) or by pressing the hotkey (by default, this is Windows KeySpace).
If you have an RPi4, and would like to configure a dual monitor setup, please see these notes (also contains some useful hints for single monitor deployment, applicable to all models).
If you wish to add Bluetooth peripherals (e.g., a wireless mouse and/or keyboard) to your RPi, please see below.
If you would like to run benchmarks on your RPi system, please see these notes.
For hardware-accelerated YouTube playback, please see this post. Also please note that as of v1.5.4 of the image, you can (particularly on a Pi4B with a fast Internet connection) use Applications→Internet→SMTube (YouTube, Hi-Res) to play back videos from YouTube in 1080p, where available; this is significantly better than the currently bundled browsers (Firefox and Chromium) can achieve.
The @world set of packages (from /var/lib/portage/world) pre-installed on the image may be viewed here (note that the version numbers shown in this list are Gentoo ebuilds, but they generally map 1-to-1 onto upstream package versions).
The full package list for the image (which includes @system and dependencies) may also be viewed, here.
The system on the image has been built via a minimal install system and stage 3 from Gentoo (arm64, available here), but all binaries (libraries and executables) have been rebuilt (with profile 17.0) to run optimally on the Raspberry Pi 4 B’s Cortex-A72-based SoC, while still retaining backwards compatibility with the older Pi 3 (B and B) model’s Cortex-A53. The /etc/portage/make.conf file used on the image may be viewed here, augmented by the custom profile’s make.defaults. The CHOST on the image is aarch64-unknown-linux-gnu (per these notes). All packages have been brought up to date against the Gentoo tree as of 11 June 2020. The image contains two kernels: one (bcmrpi3-kernel-bis) is used when booting on the RPi3 B/B+, and the other (bcm2711-kernel-bis) when booting on an RPi4. The correct kernel is chosen automatically at boot time. Each kernel has a distinct release name, and so a separate module set in /lib/modules/.
Note: the CFLAGS used for the image build is -march=armv8-a+crc -mtune=cortex-a72 -O2 -pipe. You can of course re-build selective components with more aggressive flags yourself, should you choose. As the SIMD FPU features are standard in ARMv8, there is no need for -mfpu=neon mfloat-abi=hard etc., as you would have had on e.g. the 32-bit ARMv7a architecture. Note that AArch64 NEON also has a full IEEE 754-compliant mode (including handling denormalized numbers etc.), there is also no need for -ffast-math flag to fully exploit the FPU either (again, unlike earlier ARM systems). Please refer to the official Programmer’s Guide for ARMv8-A for more details. Neither the Pi3 nor Pi4 is shipped with the ARMv8 hardware crypto extensions enabled, unfortunately.
When logged in as demouser, it is sensible to change the password (from raspberrypi64) and root’s password (also from raspberrypi64). Open a terminal window and do this now:
demouser@pi64 ~ $ passwd
Changing password for demouser.
(current) UNIX password: <type raspberrypi64 and press Enter>
New password: <type your desired password, and press Enter>
Retype new password: <type the desired password again, and press Enter>
passwd: password updated successfully
demouser@pi64 ~ $ su -
Password: <type raspberrypi64 and press Enter, to become root>
pi64 ~ # passwd
New password: <type your desired password for root, and press Enter>
Retype new password: <type the desired root password again, and press Enter>
passwd: password updated successfully
pi64 ~ # exit
logout
demouser@pi64 ~ $
If you want to create your own account, you can do so easily. Open a terminal, su to root, then issue (adapting with your own details, obviously!):
pi64 ~ # useradd --create-home --groups "adm,disk,lp,wheel,audio,video,cdrom,usb,users,plugdev,portage,cron,gpio,i2c,spi" --shell /bin/bash --comment "Sakaki" sakaki
pi64 ~ # passwd sakaki
New password: <type your desired password for the new user, and press Enter>
Retype new password: <type the desired password again, and press Enter>
passwd: password updated successfully
You can then log out of demouser, and log into your new account, using the username and password just set up. When prompted with the Welcome to the first start of the panel dialog, select Use default config, as this provides a useful ‘starter’ layout.
Depending on how quickly you select Use default config, you may find you are left with a black desktop background. This issue should resolve itself after your next login, however.
Then, once logged in, you can delete the demouser account if you like. Open a terminal, su to root, then:
pi64 ~ # userdel --remove demouser
userdel: demouser mail spool (/var/spool/mail/demouser) not found
The mail spool warning may safely be ignored. Also, if you want your new user to be automatically logged in on boot (as demouser was), substitute your new username for demouser in the file /etc/lightdm/lightdm.conf.d/50-autologin-demouser.conf (and if you do not want autologin, this file may safely be deleted).
One hint worth bearing in mind: desktop compositing is on for new users by default (unless you are using a Pi3 and have a very high-resolution display, when it will automatically be turned off for you). This gives nicely rendered window shadows etc. but if you find video playback framerates (from VLC etc.) are too slow, try turning it off (Applications→Settings→Window Manager Tweaks, Compositor tab).
Note that as of version 1.1.2 of the image, a number of Xfce ‘fixups’ will automatically be applied when a new user logs in for the first time; these include:
1) synchronizing compositing to the vertical blank (without which menus flash annoyingly under VC4);
2) setting window move and resize opacity levels; and
3) ensuring the desktop background displays on login (otherwise it often stays black; note that this fix sometimes does not work for the first login of a new user, as noted above).
They are managed by the xfce-extra/xfce4-fixups-rpi3 package (which inserts an entry into /etc/xdg/autostart/).
Keeping Your System Up-To-Date
You can update your system at any time. As there are quite a few steps involved to do this correctly on Gentoo, I have provided a convenience script, genup (source, manpage) to do this as part of the image.
Note that by default, this script will run automatically once per week, commencing the second week after first boot (see the task installed in /etc/cron.weekly). Review the logfile /var/log/latest-genup-run.log to see changes made by the latest auto-update run.
As of version 1.3.0 of the image, a number of additional ‘fixups’ will also be applied weekly - these are small scripts (which may be viewed here) used to address emergent issues that e.g. may prevent your system updating correctly. The output may be reviewed in /var/log/latest-fixup-run.log. Disabling auto-updating (see text immediately below) will also disable the fixup cronjob.
If you would rather not use auto-updating, simply edit the file /etc/portage/package.use/rpi-64bit-meta so it reads (the relevant line is the last one):
# Enable/disable any metapackage USE flags you want here, and then
# re-emerge dev-embedded/rpi-64bit-meta to have the effect taken up
# e.g. you might set (uncommented):
#
#    dev-embedded/rpi-64bit-meta -weekly-genup
#
# to disable the automated weekly genup (package update)
# run.
#
# Unless you override them, the default metapackage flags are used.
# At the time of writing, those are (default flag status shown as + or -):
#
#  + boot-fw : pull in the /boot firmware, configs and bootloader
#  + kernel-bin : pull in the binary kernel package
#  - porthash : pull in repo signature checker, for isshoni.org rsync
#  + weekly-genup: pull in cron.weekly script, to run genup automatically
#  + innercore: pull in essential system packages for image (RPi initscripts etc.)
#  + core: pull in main packages for image (clang etc.) (requires innercore)
#  + xfce: pull in packages for baseline Xfce4 system (requires core)
#  - pitop: pull in Pi-Top support packages (NB most users will NOT want this;
#      the Pi-Top is a DIY laptop kit based around the RPi3) (requires xfce)
#  - apps: pull in baseline desktop apps (libreoffice etc.) (requires xfce)
#
# NB the main point of the core, xfce, pitop and apps USE flags is just to let
# you reduce what is in your @world set (/var/lib/portage/world).
dev-embedded/rpi-64bit-meta -weekly-genup
Then re-emerge the meta package, which will remove the cron entry (NB: doing it this way ensures the entry stays removed, even if you later manually update your system):
pi64 ~ # emerge -v rpi-64bit-meta
Of course, you can always use genup directly (as root) to update your system at any time. See the manpage for full details of the process followed, and the options available for the command.
Bear in mind that a genup run will take around three to six hours to complete, even if all the necessary packages are available as binaries on the binhost. Why? Well, since Gentoo’s Portage - unlike most package managers - gives you the flexibility to specify which package versions and configuration (via USE flags) you want, it has a nasty graph-theoretic problem to solve each time you ask to upgrade (and it is mostly written in Python too, which doesn’t help ^-^). Also, many of the binary packages are themselves quite large (for example, the current libreoffice binary package is >100MiB) and so time-consuming to download (unless you have a very fast Internet connection).
When an update run has completed, if prompted to do so by genup (directly, or at the tail of the /var/log/latest-genup-run.log logfile), then issue:
pi64 ~ # dispatch-conf
to deal with any config file clashes that may have been introduced by the upgrade process.
For more information about Gentoo’s package management, see my notes here.
You may also find it useful to keep an eye on this project’s (sticky) thread in the ‘Gentoo on ARM’ forum at gentoo.org, as I occasionally post information about this project there.
Installing New Packages Under Gentoo
The following is only a very brief intro to get you started. For more information, see the Gentoo handbook.
You can add any additional packages you like to your RPi. To search for available packages, you can use the (pre-installed) eix tool. For example, to search for all packages with ‘hex editor’ in their description:
demouser@pi64 ~ $ eix --description --compact "hex.editor"
[N] app-editors/curses-hexedit (--): full screen curses hex editor (with insert/delete support)
[N] app-editors/dhex (--): ncurses-based hex-editor with diff mode
[N] app-editors/hexcurse (--): ncurses based hex editor
[N] app-editors/lfhex (--): A fast hex-editor with support for large files and comparing binary files
[N] app-editors/qhexedit2 (--): Hex editor library, Qt application written in C++ with Python bindings
[N] app-editors/shed (--): Simple Hex EDitor
[N] app-editors/wxhexeditor (--): A cross-platform hex editor designed specially for large files
[N] dev-util/bless (--): GTK# Hex Editor
Found 8 matches
(your output may vary).
Then, suppose you wanted to find out more about one of these, say shed:
demouser@pi64 ~ $ eix --verbose app-editors/shed
* app-editors/shed
     Available versions:  *1.12 *1.13 ~*1.15
     Homepage:            http://shed.sourceforge.net/
     Find open bugs:      https://bugs.gentoo.org/buglist.cgi?quicksearch=app-editors%2Fshed
     Description:         Simple Hex EDitor
     License:             GPL-2
(again, your output may vary, depending upon the state of the Gentoo repo at the time you run the query, your version of eix, etc.)
That ‘*’ in front of versions 1.12 and 1.13 indicates that the package has not yet been reviewed by the Gentoo devs for the arm64 architecture, but that its versions 1.12 and 1.13 have been reviewed as stable for some other architectures (in this case, amd64, ppc and x86 - you can see this by reviewing the matching ebuilds, at /usr/portage/app-editors/shed/shed-1.12.ebuild and /usr/portage/app-editors/shed/shed-1.13.ebuild). Version 1.15 is also marked as being in testing (the ‘~*’) for those (other) architectures.
However, you will find that most packages (which don’t have e.g. processor-specific assembly or 32-bit-only assumptions) will build fine on arm64 anyway, you just need to tell Gentoo that it’s OK to try.
To do so for this package, become root, then issue:
pi64 ~ # echo "app-editors/shed * ~*" >> /etc/portage/package.accept_keywords/shed
The above means to treat as an acceptable build candidate any version marked as stable on any architecture (the '*') or as testing on any architecture (the ‘~*’). The second does not imply the first - for example, shed-1.12 is not marked as testing on any architecture at the time of writing, so just ‘~*’ wouldn’t match it.
Then you can try installing it, using emerge:
pi64 ~ # emerge --verbose app-editors/shed

These are the packages that would be merged, in order:

Calculating dependencies... done!
[ebuild  N    *] app-editors/shed-1.15::gentoo  86 KiB

Total: 1 package (1 new), Size of downloads: 86 KiB

>>> Verifying ebuild manifests
>>> Emerging (1 of 1) app-editors/shed-1.15::gentoo
>>> Installing (1 of 1) app-editors/shed-1.15::gentoo
>>> Recording app-editors/shed in "world" favorites file...
>>> Jobs: 1 of 1 complete                           Load avg: 1.25, 0.56, 0.21
>>> Auto-cleaning packages...

>>> No outdated packages were found on your system.

 * GNU info directory index is up-to-date.
Once this completes, you can use your new package!
Note that if you intend to install complex packages, you may find it easier to set ACCEPT_KEYWORDS="* ~*" in /etc/portage/make.conf, since many packages are not yet keyworded for arm64 yet on Gentoo. Obviously, this will throw up some false positives, but it will also mostly prevent Portage from suggesting you pull in ‘live’ (aka -9999, aka current-tip-of-source-control) ebuilds, which can easily create a nasty dependency tangle.
Once you get a package working successfully, you can then explicitly keyword its dependencies if you like (in /etc/portage/package.accept_keywords/...), rather than relying on ACCEPT_KEYWORDS="* ~*" in /etc/portage/make.conf. Should you do so, please feel free to file a PR against the genpi64:default/linux/arm64/17.0/desktop/genpi64 profile with your changes, so that others can benefit (I intend to submit keywords from this profile to be considered for inclusion in the main Gentoo tree, in due course).
Have fun! ^-^
If you need to install a particular package that isn’t currently in the Gentoo tree, note that it is possible to install binary packages from Raspbian (or other 32-bit repos) on your 64-bit system. For further details, please see these notes.
Alternatively, to install source packages with highly resource-intensive build profiles (such as dev-lang/rust), you can temporarily mount the image within a binfmt_misc QEMU user-mode chroot on your Linux PC, and perform the emerge there. This technique allows you to easily leverage the increased memory and CPU throughput of your regular desktop machine. For further details, please see my wiki tutorial here.
Miscellaneous Configuration Notes, Hints, and Tips (↓skip)
You don’t need to read the following notes to use the image, but they may help you better understand what is going on!
NB some of the following notes need updating for the new 1.6.0 image. I plan to do this shortly.
-
For simplicity, the image uses a single ext4 root partition (includes /home), which by default will be auto-resized to fill all remaining free space on the microSD card on first boot. Also, to allow large packages (such as gcc) to be built from source without running out of memory on smaller systems, a 1 GiB swapfile has been set up at /var/cache/swap/swap1, and on boot this will be auto-resized if necessary, if space becomes tight (by this service). Feel free to modify this configuration as desired (for example, you can significantly improve performance under load by setting up a dedicated swap device on a separate bus from the system’s rootfs; for details, please see this short tutorial).
Incidentally, it is possible to get an RPi3 Model B to boot from a USB drive (no microSD card required); see for example these instructions (try at your own risk!), and furthermore the RPi3 Model B+ can boot a USB-written image without modification, as it has the necessary OTP fuses factory set. Alternatively, you can retain /boot on the microSD card, but use a USB drive for the system root (remember to modify /boot/cmdline.txt and /etc/fstab accordingly, if you choose to go this route). At the time of writing, the RPi4 does not yet support direct USB boot (although this feature is pending, and you can always use the split sys{b,r}oot method just mentioned: NB, if doing so I recommend you use the a USB2 port for your rootfs on the RPi4, until the FIQ is implemented on the aarch64 kernel).
-
As of version 1.3.0 of the image, the zswap in-memory transparent compressing swap cache is in use. Under most normal workloads, this should improve responsiveness when the system starts to run out of memory, by intercepting swapped-out memory pages, compressing them, and storing them in a dynamic RAM buffer instead of hitting flash. The rpi3-zswap service may be viewed here, and configured via /etc/conf.d/rpi3-zswap.
-
Because the Pi has no battery-backed real time clock (RTC), I have used the swclock (rather than the more usual hwclock) OpenRC boot service on the image - this simply sets the clock on boot to the recorded last shutdown time. An NTP client, chronyd, is also configured, and this will set the correct time as soon as a valid network connection is established.
Note that this may cause a large jump in the time when it syncs, which in turn will make the screensaver lock come on. Not a major problem, but something to be aware of, as it can be quite odd to boot up, log in, and have your screen almost immediately lock! For this reason, the demouser account on the image has the screensaver disabled by default.
-
The image is configured with NetworkManager, so achieving network connectivity should be straightforward. The Ethernet interface is initially configured as a DHCP client, but obviously you can modify this as needed. Use the NetworkManager applet (top right of your screen) to do this; you can also use this tool to connect to a WiFi network.
Note that getting WiFi to work on the RPi3/4 requires appropriate firmware (installed in /lib/firmware/brcm): this is managed by the sys-firmware/brcm43430-firmware package (see below). On the RPi3 B+ and RPi4 B, dual-band WiFi is supported.
-
Bluetooth is operational on this image, but since, by default, the Raspberry Pi 3 uses the hardware UART / ttyAMA0 to communicate with the Bluetooth adaptor, the standard serial console does not work and has been disabled (see /etc/inittab and /boot/cmdline.txt). You can of course change this behaviour if access to the hardware serial port is important to you.
Bluetooth on the RPi3/4 also requires a custom firmware upload. This is carried out by a the rpi3-bluetooth OpenRC service, supplied by the net-wireless/rpi3-bluetooth package (see below).
- Tip: to connect a new Bluetooth device to your RPi3/4 (a wireless mouse or keyboard, for example), first click on the Bluetooth icon in the top toolbar. When the
Bluetooth Devices panel opens, click on Search, and make your device discoverable (this will usually involve pressing or holding a button or switch on the device itself), shortly after which it should appear in the listing. Once it does, click on it, then press Setup…, then ensure the Pair Device radio button is selected, and click Next. Then, if you are attaching a more complex device such as a keyboard, you’ll see a PIN code notification message displayed (simpler devices, such as mice, often don’t require a PIN for pairing, in which case no message will show). If you are prompted with a PIN, enter the code given into your device (for a keyboard, this normally means typing it in and pressing Enter). Once the devices are paired, you’ll be prompted where to connect the device to: ensure the Human Interface Device Service (HID) radio button is selected, and click Next. Hopefully you will then see a message telling you Device added and connected successfully; click Close to dismiss it. With this done, your new device should start working. However, if you want to have it connect again automatically each boot, there’s one more step you need to do. Click on your new device in the list (its icon should now be showing a key symbol, indicating that it is paired), and then click on the Trust shortcut button (the one that looks like a four-pointed gold star). With this done, your device setup is complete! You can add multiple interface devices to your RPi3/4 in this manner.
-
The Pi uses the first (vfat) partition of the microSD card (/dev/mmcblk0p1) for booting. The various (closed-source) firmware files pre-installed there may are managed by the sys-boot/rpi3-64bit-firmware package (see below). Once booted, this first partition will be mounted at /boot, and you may wish to check or modify the contents of the files /boot/cmdline.txt and /boot/config.txt.
-
Because of licensing issues (specifically, bindist compliance), Mozilla Firefox Quantum has been distributed in its ‘developer’ edition - named ‘Aurora’. Bear in mind that this app will take quite a long time (20 to 30 seconds on an RPi3, somewhat less on a an RPi4) to start on first use, as it sets up its local storage in ~/.mozilla/<...>.
- As your copy of Firefox is updated, you may see its title-bar name change sometimes to ‘Nightly’ (where that particular edition is taken from the eponymous release channel).
- I have also pre-installed the lighter-weight Links browser on the image, in case you would like to use this in preference to Firefox.
- For additional security, you can consider running Firefox inside an X11
firejail sandbox. See these notes for further details (the setup described therein will work on arm64; I use it configured that way on my own RPis).
-
As of v1.3.1 of the image, the full-scale browser Chromium is also included on the image. For bindist compliance, I use a modified ebuild and turn off the patent-encumbered h264 software codec.
-
It is a similar story with the Mozilla Thunderbird mail client. Its bindist-compliant developer edition (installed on the image) is named ‘Earlybird’.
- Claws Mail has also been pre-installed on the image, if you want a lighter-weight, but still fully featured, mail client.
-
By default, the image uses the Pi’s VC4 GPU acceleration (VC6 in the Pi4, although it still uses the vc4... kernel modules) in X, which has reasonable support in the 4.19.y kernel and the supplied userspace (via media-libs/mesa ultimately - this has been tweaked
on the image to include v3d support for the new Pi4). Note however that this is still work in progress, so you may experience issues with certain applications. The image (as shipped) uses the mixed-mode vc4-fkms-v3d overlay / driver (see /boot/config.txt, or Applications→Settings→RPi Config Tool; you can change the driver if you wish to, or are experiencing serious glitches). On my RPi4 B at least, a glxgears score significantly in excess 1000fps can be obtained on an unloaded system (~400fps on a loaded desktop). Incidentally, in normal use the main load is the Xfce window manager’s compositor - try turning it off to see (via Applications→Settings→Window Manager Tweaks, Compositor tab) . YMMV - if you experience problems with this setup (or find that e.g. your system is stuck on the ‘rainbow square’ at boot time after a kernel update), you can fall-back to the standard framebuffer mode by commenting out the dtoverlay=vc4-fkms-v3d line in /boot/config.txt (i.e., the file config.txt located in the microSD card’s first partition).
Kodi, VLC and SMPlayer have been pre-installed on the image, and they will all make use of accelerated (Mesa/gl) playback. Because of incompatibilities and periodic crashes when using it, XVideo (xv) mode has been disabled in the X server (/etc/X11/xorg.conf.d/50-disable-Xv.conf); this doesn’t really impinge on usability. NB: if you find video playback framerates too slow, it is always worth disabling the window manager’s compositor (see point immediately above) as a first step. Hint: for some video types, SMPlayer and Kodi perform significantly better than VLC, so if you do experience ‘glitchy’ playback with one media player, try using one of the others.
-
As of v1.4.0 of this image, ‘true’ kms mode (vc4-kms-v3d) is usable for regular RPi users (this can be easily selected via Applications→Settings→RPi Config Tool). Please note that window manager compositing should be turned off when using this mode, and accordingly, I have modified the existing rpi3-safecompositor service to do this automatically.
For avoidance of doubt, fkms, the shipped default, is unaffected by this. Also please note that Pi-Top users should not use the ‘true’ kms mode; as Pi-Top speaker audio output is not supported under it. Also, since fkms mode is the factory default for the Buster release of Raspbian, it is likely to receive the most support going forward, and as such, my recommendation would be to stick with that.
-
ALSA sound on the system is operative and routed by default through the headphone jack on the Pi. If you connect a sound-capable HDMI monitor (or television) sound should automatically also play through that device (in parallel) - at the moment there is only one ‘master’ volume control available.
In addition to Kodi, VLC and SMPlayer (all of which can play audio) the image also includes Clementine, which has good audio library support and is well integrated with on-line music services. NB - on first launch, Clementine sometimes fails to start, if it has difficulties creating its necessary database files. If this occurs, log out, log back in, and try launching Clementine again. Once it has first started successfully (for a given user) the issue disappears.
Hint: if you have headphones connected to your RPi3, but can’t hear anything, issue (as the regular user, in a terminal) amixer -c 0 cset numid=3 1 to force sound to route to the onboard jack (this will cause HDMI output to be muted too). Issue amixer -c 0 cset numid=3 2 to turn HDMI audio output on again (muting the headphones).
-
As of v1.5.0 of the image, full pulseaudio support has been built into all supplied packages (via a global USE flag).
-
If you are using a Pi-Top chassis, have emerged rpi-64bit-meta with the pitop USE flag set, and have one or more pi-topSPEAKER units plugged in, the HDMI audio stream will automatically play though these. You should also be able to change the screen backlight brightness using the keyboard buttons, see the remaining battery charge in the top panel, and find that the when you shut down your system, the hub powers off your Pi-Top properly.
- Pi-Top (v1) users: you can (at your option) swap out your existing RPi3 Model B board for a RPi3 Model B+; everything should work as before, but performance will be increased somewhat (the peak normal clock speed of the B+ is faster (at 1.4GHz) than the B (at 1.2GHz); also, the B+ includes a heat spreader, so is less prone to thermal throttling when worked hard). While you could in principle also use an RPi4 in the Pi-Top chassis, you’d need an adaptor for the microHDMI and power connectors, and you may also find the unit draws more power than the Pi-Top circuitry can supply, so this approach is not recommended.
-
The frequency governor is switched to ondemand (from the default, powersave), for better performance, as of version 1.0.1. This is managed by the sys-apps/rpi3-ondemand-cpufreq package (see below).
- If you are using an RPi3 Model B board, the frequency will switch dynamically between 600MHz and 1.2GHz, depending on load. On a Model B+, it will switch between 600MHz and 1.4GHz. On an RPi4, it will switch between 600MHz and 1.5GHz.
-
On the RPi4, you can easily try overclocking your system, without voiding your warranty. To do so, open Applications→Settings→RPi Config Tool app, select the Pi4 Tuning tab, select an option from Mid to Extreme in the supplied ‘manettino’ ^-^, click Save and Exit, then elect to reboot when prompted. Note that you are likely to require active cooling for your RPi4 when overclocked, and it is always possible (although unlikely) that your device may fail to boot at the faster settings (if it does, simply edit the file config.txt on the first partition of the microSD card, comment out the arm_freq and gpu_freq settings, and try again).
-
On the RPi4, please make sure your EEPROM firmware is up-to-date; there is (at the time of writing) an official update available (0137a8.bin) that can lower power consumption by around 300mW, which makes a significant difference to this somewhat thermally challenged ^-^ device. For more details please see this post.
-
PermitRootLogin yes has explicitly been set in /etc/ssh/sshd_config, and sshd is present in the default runlevel. This is for initial convenience only - feel free to adopt a more restrictive configuration.
-
I haven’t properly tested suspend to RAM or suspend to swap functionality yet.
-
As of version 1.0.1, all users in the wheel group (which includes demouser) have a passwordless sudo ability for all commands. Modify /etc/sudoers via visudo to change this, if desired (the relevant line is %wheel ALL=(ALL) NOPASSWD: ALL).
-
As mentioned above, by default on first boot the image will attempt to automatically expand the root (second) partition to fill all remaining free space on the microSD card. If, for some reason, you elected not to do this (and so renamed the sentinel file autoexpand_root_partition to autoexpand_root_none prior to first boot), you can easily expand the size of the second (root) partition manually, so that you have more free space to work in, using the tools (fdisk and resize2fs). See these instructions, for example. I strongly recommend you do expand the root partition (whether using the default, first-boot mechanism or manually) if you are intending to perform large package (or kernel) builds on your Pi (it isn’t necessary just to play around with the image of course).
-
If you are using the [official 7" touchscreen](https://www.element14.com/co
README 内容过长,已截取前 64 KB。完整内容请前往 GitHub 仓库查看。


评论