Optolink Switch/Splitter
Make your Viessmann heating locally available via MQTT and TCP/IP while keeping Optolink/ViCare App & more!

Use this software at your own risk.
For latest developments always check the Version-Log
🎉 Announcements
-
Version 1.11.4.0 Schedulings clear text write using /set Now possible to write schedulings (heating, hot water, DHW circulation) using clear text with /set feature:
e.g. topic vito/circulation_monday/set,
payload 8:00-9:00 *3, 12:00-13:00 *1, 19:30-22:00 *2
-
Version 1.11.0.0 Poll cycle groups implemented and the possibility to alter the cycles at run-time using action command setpollcycle;<groupkey>;<value>
Since V1.10.1 the entire Optolink communikation with the heating device can get logged. Up from V1.10.5 a ‘global re-start loop’ got implemented to restart the splitter in case of problems.
-
Version 1.10.0.0 New Feature: User-Friendly MQTT /set Topics! Write values using the same format they’re published in! Example: Publish vito/c1_temp_room_setpoint/set with payload 21.5 instead of complex command syntax. Supports ON/OFF, boolean, and numeric values with automatic scaling. See MQTT_SET_TOPICS.md for details. Thank you @manuboek!
-
Need VS1 / KW protocol support? It got implemented in the main tree since V1.8.0.0. Just set vs1protocol = True
Still TESTERS WANTED with KW device and Vitoconnnect!
-
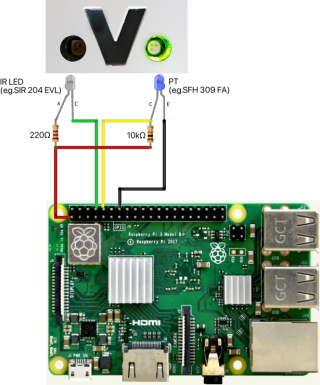
minimal Optolink Adapter confirmed:
📌 Table of Contents
:rocket: Introduction
Key Benefits
- Local Control and Cloud Capability – Allow full local control and datapoint access while retaining the ability of Viessmann Cloud and App access.
- Viessmann Heating/Heat Pump Compatibility – Works with Vitodens, Vitocal, Vitocrossal and most other Optolink featured devices.
- Smart Home Ready – Integrates with Home Assistant, ioBroker, Node-RED or any other system with MQTT Support.
- Supports VS2/300 and VS1/KW protocols now within a single branch.
- with VS1/KW devices/protocol probably Vitoconnect might not work. TESTER WANTED with KW device and Vitoconnect!
- For VS1/KW with Vitoconnect, the viconn-listener is available (currently in beta).
Videos
🎥 Introduction Video (German): Watch on YouTube
📖 Extended Setup Tutorial (German): Rustimation Blog
:file_folder: Software Requirements
- Python (version >= 3.9):
- pyserial:
pip install pyserial
- MQTT (version >= 2.0):
pip install paho-mqtt
- Virtual environment recommended (Guide).
:desktop_computer: Hardware Requirements
- Raspberry Pi or a suitable system.
- Viessmann Optolink-compatible heating (Vitodens, Vitocal, Vitocrossal, etc.).
- Optolink r/w head:
- Original Viessmann model or self-made.
- Volkszaehler-compatible versions may work if LED distance is adjusted (8€ option).
- To retain ViCare App functionality, use a USB-to-TTL adapter:
- Recommended: CP2102 chip (Example).
- Some newer Vitoconnect models may work with FTDI chips.
- Raspberry Pi UART voltage = 3.3V → Set jumper accordingly!
:hammer_and_wrench: Installation
1. Clone the Repository
git clone https://github.com/philippoo66/optolink-splitter.git
cd optolink-splitter
2. Create Virtual Environment & Install Dependencies
Using a virtual environment is recommended to keep dependencies isolated and avoid conflicts with system-wide packages. More details can be found in this guide.
2.1. Create & activate the virtual environment:
python3 -m venv myvenv
source myvenv/bin/activate  # On Windows use: myvenv\Scripts\activate
2.2. Install required dependencies:
pip install pyserial
pip install paho-mqtt  # Only if MQTT is used
NOTE: After installation, the environment must be activated before running the script.
On initial install
- copy
settings_ini.py.example to settings_ini.py. Modify settings_ini.py according to your heating device.
- copy
poll_list.py.example to poll_list.py and modify it according to your desired datapoints.
If you’re using Home Assistant consider to utilize homeassistant_poll_list.py for combined datapoints and entities definition (see Wiki for details)!
Regading datapoints refer
4. Run the Script
source myvenv/bin/activate  # Make sure to activate the virtual environment. On Windows use: venv\Scripts\activate
python3 optolinkvs2_switch.py
For automatic startup, set up a service. See the Wiki Guide.
Updating to a new Version
If you want to update your installation to a new version, the recommended way is to
- make a backup copy of your current installation (folder)
- from the new version repo, clone all files into your original folder (replace existing files)
It is not necessary anymore to add new settings to your settings_ini since there are default values used for every setting. Also your settings_ini.py, poll_list.py and homeassistant_poll_list.py will not get overwritten anymore since all those files got the extension .example in the repo since V1.9.
Don’t forget to restart the script / the service afterwards.
Even though I promise to note required changes carefully in the version log from now on, after an update it is always a good practice to start the splitter once in the console (python optolinkvs2_switch.py, remember to run your virtual environment) since in the console you get quite detailed error messages if some would be wrong or missing.
:electric_plug: Connecting Optolink & Vitoconnect
Parallel use with Vitoconnect / ViCare App
- Ensure the serial port is enabled and serial console is disabled (Guide).
- CP2102 Interface:
- Cross RX/TX lines.
- Set voltage jumper to 3.3V.
- Use
ttyAMA0 instead of ttyS0 for Raspberry Pi 3+ (Details).
Vitoconnect Interfaces
Vitoconnect 100 OPTO1
To ensure proper communication with the system, follow the power-on sequence exactly:
- Connect all wires and plugs to the Raspberry Pi and Vitoconnect.
- Power on the Raspberry Pi.
- Run the script and wait for the prompt:
awaiting VS2....
- Power on Vitoconnect 100 OPTO1.
Vitoconnect OPTO2
The startup sequence for this device is not critical, as it will automatically reconnect without issues.
:receipt: Command Syntax: MQTT & TCP/IP
Optolink Splitter can connect to an MQTT Broker for sending commands and receiving responses. Alternatively, a direct TCP/IP connection (e.g. using PuTTY) can be established to interact with the application directly. For more details on the command syntax, see the Wiki | Command Syntax Overview or go directly to the section on MQTT and TCP/IP requests.
Note for TCP/IP Connections:
You may close the TCP session by sending exit as a string.
:pushpin: User-Friendly MQTT /set Topics
In addition to the command syntax above, you can now write values using simple MQTT topics.
For every datapoint published to MQTT (e.g., vito/hk1_normal_temperature), you can write to it using a /set suffix:
# Reading (automatic, via poll_list)
Topic: vito/hk1_normal_temperature
Payload: 20.5

# Writing (simple and intuitive!)
Topic: vito/hk1_normal_temperature/set
Payload: 21.0
Quick Examples:
# Set room temperature (automatic scaling applied)
mosquitto_pub -t "vito/hk1_normal_temperature/set" -m "21.5"

# State on/off
mosquitto_pub -t "vito/hk1_partymode/set" -m "ON"
mosquitto_pub -t "vito/hk1_partymode/set" -m "OFF"

# Set hot water temperature
mosquitto_pub -t "vito/hotwater_temperature/set" -m "50"

# run circulation pump
# 8:00-9:00 continuously (function code 3),
# 12:00-13:00 5 minutes every half hour (function code 1)
# 19:30-22:00 5 minutes every 15 minutes (function code 2)
mosquitto_pub -h your-broker -t "Vito/dhw_circulation_monday/set" -m "8:00-9:00 *3, 12:00-13:00 *1, 19:30-22:00 *2"
MQTT Explorer example:

For complete documentation with more examples, see MQTT_SET_TOPICS.md.
:house: Smart Home Integration (e.g. Home Assistant)
Optolink Splitter seamlessly integrates into your smart home setup via MQTT, allowing you to monitor and control your Viessmann heating system using platforms like Home Assistant, ioBroker, or Node-RED. All available heating system data can be visualized in dashboards, automated with custom rules, and integrated into broader smart home routines. With Optolink Splitter’s command-sending capability, you can locally adjust heating modes, temperature setpoints, or pump states directly from your favorite smart home system.
For detailed Home Assistant integration instructions, see the Wiki | Home Assistant Integration of Optolink‐Splitter.
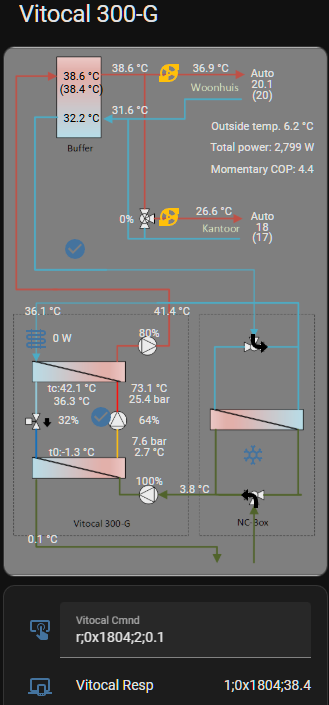
Below are examples of how this integration looks in different smart home environments:
Heating System Overview in Home Assistant (Built with a Picture Entity Card)

Details
:interrobang: Questions & Issues
:printer: 3D-Printable Case for Raspberry Pi & USB-TTL Adapter
A compact and practical 3D-printable case designed for Raspberry Pi 2 & 3 including a CP2102 USB-TTL adapter mount. A version for Raspberry Pi 4 may be available in the future. Special thanks to Kristian!
Raspberry Pi 2/3 Case with CP2102 UART Board Holder
:camera_flash: Additional Images (MQTT, Visualization)
Datapoints in settings_ini.py & MQTT Explorer monitoring

Data visualisation

:memo: Disclaimer
This software is not affiliated with, endorsed by, or associated with Viessmann in any way. The terms Vitoconnect, Optolink, Vitocal, ViCare, etc. refer to Viessmann products and technologies. All product and brand names mentioned belong to their respective owners.
It is provided as-is, without any warranties or guarantees. The authors assume no liability for any issues arising from its use.


评论