

🪐 ⚛️ Jupyter UI





React.js components 💯% compatible with 🪐 Jupyter
📖 Documentation · 🎨 Storybook · 💬 Community
Free and open source, MIT — drop the components into your own app and point them at any Jupyter Server you already run.
Built and maintained by Datalayer, which builds its own Notebooks
on these very components — and can host the Code Sandboxes they execute on, GPUs included, so
your product ships without a Jupyter Server to operate.

Jupyter UI is a set of React.js components that allow a frontend/webapp developer to build data products compatible with the Jupyter ecosystem. The user interface delivers executable notebooks, cells, terminals, file browsers and allows the developer to manage a full integrated React tree instead of relying on iframes to display the Jupyter notebooks.
📦 Packages
✨ Features
Core Components
- 📓 Notebook - Full notebook interface with cells, outputs, and toolbar
- 📝 Cell - Individual code/markdown cells with execution
- 💻 Console - Interactive Jupyter console
- 🖥️ Terminal - Web-based terminal interface
- 📁 FileBrowser - File system navigation and management
- ⚙️ Kernel Management - Kernel lifecycle and execution control
- 📊 Output Rendering - Display of execution results, plots, and widgets
Advanced Features
- 🔌 IPyWidgets Support - Full support for interactive widgets
- 👥 Collaborative Editing - Pluggable provider system supporting:
- Jupyter collaboration (WebSocket-based with Y.js)
- Custom providers via
ICollaborationProvider interface
- 🎨 Theming - JupyterLab theme support with dark/light modes
- 🔧 Extensible - Plugin system for custom functionality
- 🚀 Performance - Virtual scrolling, lazy loading, and optimizations
- 🔒 Security - Token authentication, CORS, XSS protection
Architecture Highlights
- 🏗️ Clean Architecture - Modular, composable components with clear interfaces
- 🔄 Composition Pattern - Components compose rather than inherit for maximum flexibility
- 🔌 Provider System - Pluggable collaboration providers for different backends
- 📦 One-way Dependencies - Core depends on jupyter-react, not vice versa
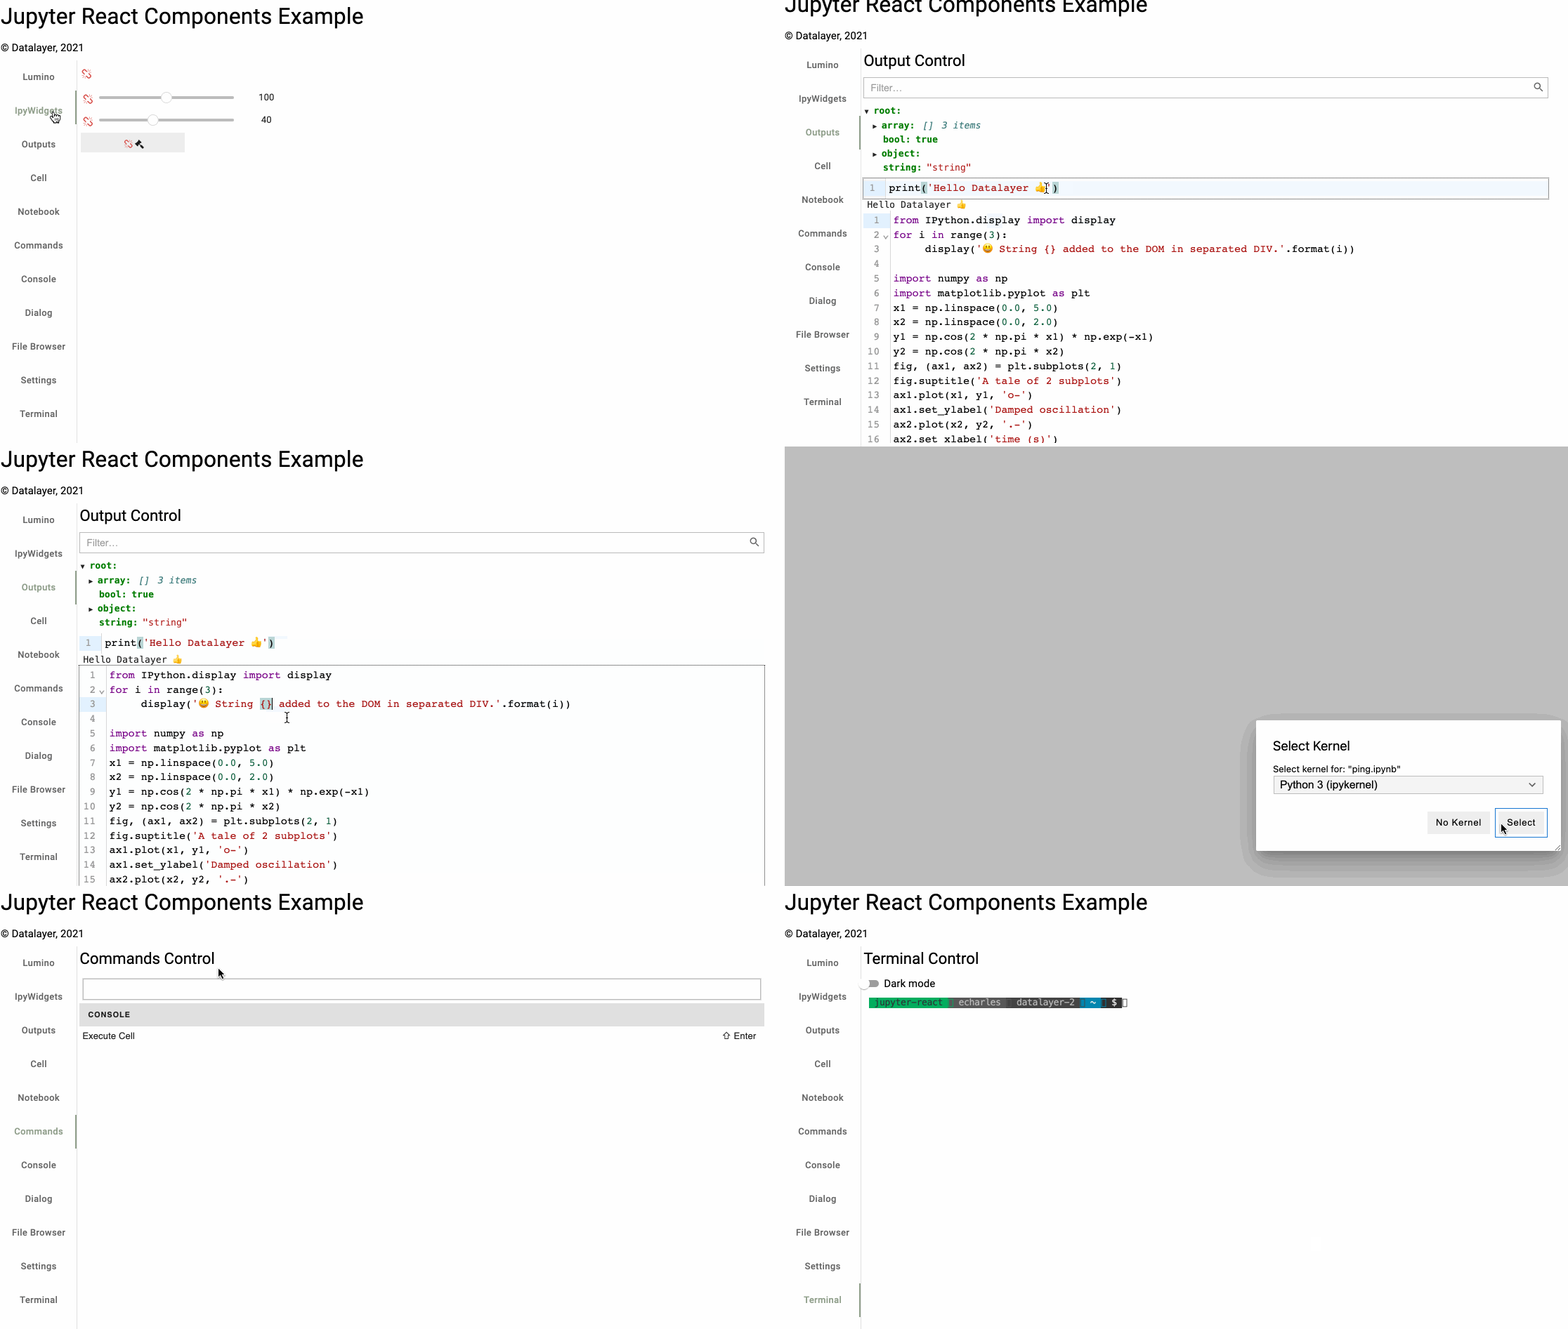
The above image shows a gallery of the available React.js components ready to be used in you custom application. These open source components are used to build Datalayer, a collaborative platform for data analysis.
🚀 Quick Start
Installation
npm install @datalayer/jupyter-react
Basic Usage
import { JupyterReactTheme, Notebook } from '@datalayer/jupyter-react';

function App() {
  return (
    <JupyterReactTheme>
      <Notebook path="notebook.ipynb" id="notebook-id" startDefaultKernel />
    </JupyterReactTheme>
  );
}
Collaborative Editing
Jupyter UI supports real-time collaboration through a pluggable provider system:
import {
  Notebook,
  JupyterCollaborationProvider,
} from '@datalayer/jupyter-react';

function CollaborativeNotebook() {
  const collaborationProvider = new JupyterCollaborationProvider();

  return (
    <Notebook
      path="notebook.ipynb"
      collaborationProvider={collaborationProvider}
    />
  );
}
Creating Custom Collaboration Providers
You can create your own collaboration provider by extending CollaborationProviderBase:
import { CollaborationProviderBase } from '@datalayer/jupyter-react';

class MyCustomProvider extends CollaborationProviderBase {
  constructor(config) {
    super('my-provider-type');
    // Initialize your provider
  }

  async connect(sharedModel, documentId, options) {
    // Implement your connection logic
    // Set up WebSocket, authenticate, etc.
  }
}

// Use it with any Notebook component
const provider = new MyCustomProvider({/* config */});
<Notebook collaborationProvider={provider} path="notebook.ipynb" />;
Development Setup
As a developer start with the setup of your environment and try one of the examples. We have documentation for more details.
# Clone the repository
git clone https://github.com/datalayer/jupyter-ui.git
cd jupyter-ui

# Install dependencies
npm install

# Build all packages
npm run build

# Start Jupyter server (required for development)
npm run jupyter:server

# Run an example
npm run jupyter:ui:vite
🎮 Try It Online
You can try the CodeSandbox examples:
We host a Storybook on ✨ https://jupyter-ui-storybook.datalayer.tech that showcases various low-level and high-level React.js components useful to build a Data Product.
Why?
The Jupyter(Lab) notebook is a tool that allows data scientist to analyse dataset. However, it is not easy to create a custom user interface integrated in an existing application. Jupyter UI, an open-source library, fills that gap and provides components that a developer can easily integrate in any React.js application.
The Jupyter(Lab) user interface is built on top of Lumino widget toolkit, an imperative way to build user interface and can not be consumed by industry standard declarative frameworks like React.js. As a user interface developer, if you want to create a custom data product on top of Jupyter, you have to stick to Lumino and carry-on the full notebook interface not tailored to your specific needs. This is not what you want. You just want to expose what you need, you want to develop with your favorite toolkit (like React.js) and you also want to integrate on a per-component basis the Jupyter functionality in your application.
We also aim removing the rigidity of the extension system and favor composition over inheritance.
IPyWidgets are supported (the Comm feature needs to be fixed). JupyterLite and PyScript support is on the roadmap. Autocompletion is also available.
You can find more context reading this abstract of the talk given at FOSDEM 2022 (video recording).
🔗 Framework Integrations
Next.js
Full server-side rendering support with the Next.js example.
Docusaurus
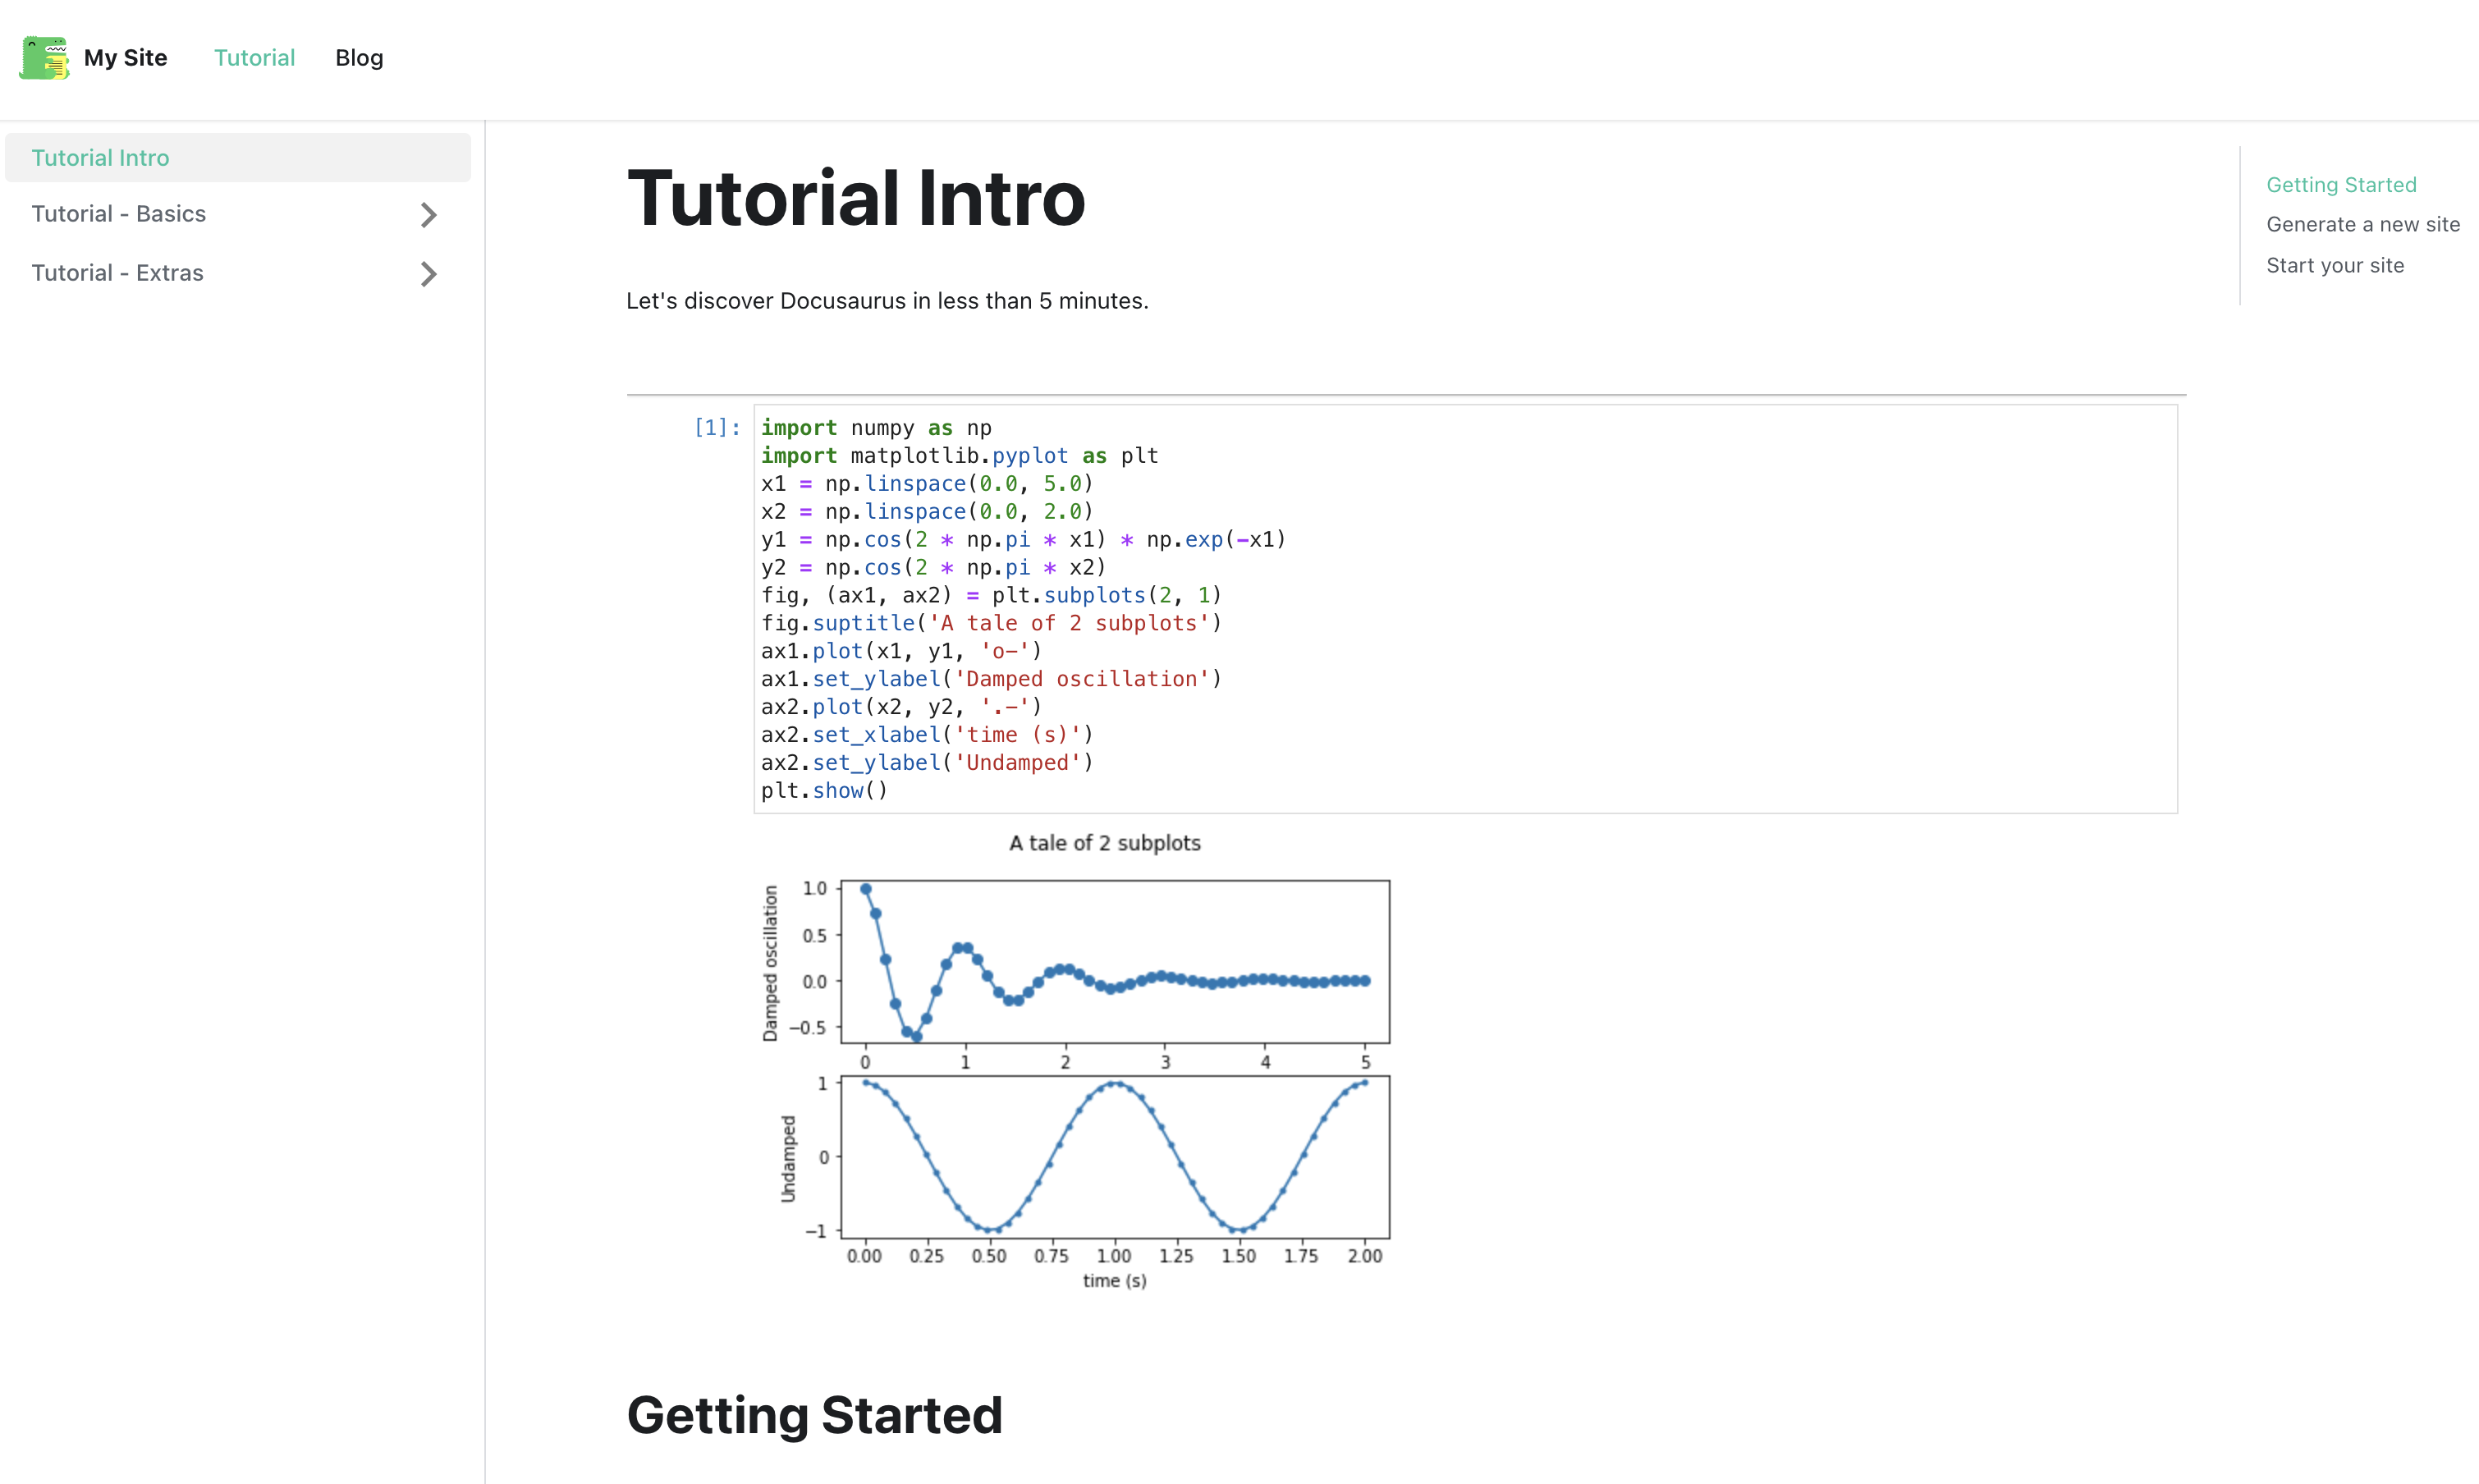
We maintain a plugin for Docusaurus in the docusaurus-plugin package (see the Docusaurus example).
Other Integrations
- Vite - Modern build tool integration (example)
- Create React App - Classic React app setup
- Lexical - Rich text editing capabilities (example)
- VS Code - Extension for notebook editing (package)
📋 Requirements
- Node.js >= 20.0.0
- npm >= 8.0.0
- Python >= 3.8 (for Jupyter server)
- JupyterLab >= 4.0.0
🤝 Contributing
We welcome contributions! Please see our Contributing Guide for details.
Development Workflow
- Fork the repository
- Create a feature branch (
git checkout -b feature/amazing-feature)
- Make your changes
- Run tests (
npm test)
- Run code quality checks (
npm run check)
- Commit your changes (
git commit -m 'Add amazing feature')
- Push to your branch (
git push origin feature/amazing-feature)
- Open a Pull Request
Code Quality
- TypeScript - Strict type checking enabled
- ESLint - Modern flat config with React and TypeScript rules
- Prettier - Consistent code formatting
- Husky - Pre-commit hooks for quality checks
- Commitlint - Conventional commit messages
Run all checks with a single command:
npm run check        # Run format check, lint, and type-check
npm run check:fix    # Run format, lint fix, and type-check
Releasing
Releases are published to npm and PyPI from a v* tag, see RELEASE.md.
💬 Support
⚖️ License
Copyright © 2022-2025 Datalayer, Inc.
Released under the terms of the MIT license (see LICENSE).
If this project is helpful to you, please give us a ⭐️
Made with ❤️ by Datalayer







评论