Read this in other languages: Italiano
Intel-WiFi-BT-and-Audio-Fix-Tahoe
How to fix Intel WiFi (tested with AX210/1675) and Bluetooth with OCLP-Mod by laobamac
Hi! I was trying to fix WiFi and Bluetooth on my Thinkpad T480 running macOS Tahoe 26.3.1 with an Intel AX210. I got a little confused and overwhelmed by all the posts and guides online, so I thought I’d write a guide myself based on what actually worked for me.
I’ll upload all the files that I used and also the links from where I downloaded them. Please note that I’ll follow the hierarchy of the folders, and especially that the config.plist you will find is merely for reference for the things used in this guide, nothing more.
Disclaimer:
Please note that it’s my first guide/repo. If I did something wrong, or if I forgot to mention or credit someone else’s work that I used to make this work, please let me know and I’ll make it right ASAP!
⚠️ Prerequisites
I know it’s kind of ironic, but you will need a working internet connection to run OCLP-Mod. Make sure you have some kind of internet connectivity working on your Hackintosh first.
- In my case, I used
itlwm with Heliport.
- USB tethering is also a good alternative. If you have an Android phone, you can use HoRNDIS by TomHeaven (everything will be linked down below).
Note on Audio: I will not focus on audio. As long as you had it working before with AppleALC or similar, it will be handled automatically in the last step of the guide by OCLP-Mod without needing you to do anything.
📦 Necessary Files
-
OCLP-Mod by laobamac: Download from GitHub Releases.
I used version 3.1.5 as it is the latest at the time of writing.
-
Kexts: These must be loaded in your config.plist in this exact order. (If you use ProperTree, just drag the kext entries to follow this scheme and make sure they are ordered properly).
For the WiFi:
IOSkywalkFamily.kextIO80211FamilyLegacy.kextAirPortBrcmNIC.kext (In ProperTree, this entry will be loaded automatically as it is a plugin of IO80211FamilyLegacy.kext)AMFIPass.kext (I’m using version 1.4.1)AirportItlwm.kext (v2.3.0_stable_Ventura)
For the Bluetooth:
BlueToolFixup.kext (from acidanthera BrcmPatchRAM)IntelBTPatcher.kext (from lshbluesky IntelBluetoothFirmware)IntelBluetoothFirmware.kext (from lshbluesky IntelBluetoothFirmware)
Tip: If you’re using ProperTree, I suggest using the OC Snapshot feature (or OC Clean Snapshot if you had previous WiFi/BT kexts that you deleted from a previous setup/attempt).
⚙️ config.plist Modifications
While you’re messing around in your config.plist, you’ll need to make a few specific modifications:
-
In Kernel -> Block, you need to enable:
com.apple.iokit.IOSkywalkFamily
-
In NVRAM -> Add -> 7C436110-AB2A-4BBB-A880-FE41995C9F82, you need to:
- Disable SIP: Set
csr-active-config to 03080000 (make sure the Type is set to Data).
- Add the following boot-args:
-amfipassbeta -ipc_control_port_options=0
- Add this two new entries (always under 7C436110-AB2A-4BBB-A880-FE41995C9F82):
bluetoothExternalDongleFailed type Data and Value set to 00;bluetoothInternalControllerInfo type Data and Value 00000000 00000000 00000000 0000.
Note: In my case, from a previous attempt at fixing WiFi/BT, I also have the following boot-args: lilubetaall -ibtcompatbeta. I don’t know if they are strictly necessary. Honestly, I forgot to remove them, but given the fact that everything seems to be working, I left them. My advice: first test without them, and if something doesn’t work, try adding them (one at a time or both, your choice).
🚀 The Guide
Starting point: You must have a working internet connection and SIP already disabled (see above). If you have these, you’re good to go.
Step 1: Prep your EFI
- Mount your EFI partition and copy the kexts into
EFI/OC/Kexts.
- Open ProperTree (or your favorite plist editor) and add your kexts (e.g., using OC Snapshot).
- Go to Kernel -> Block and enable the entry mentioned earlier.
- Go to NVRAM -> Add and set the required
boot-args.
- Save your
config.plist. (Note: Don’t disable your temporary internet kext just yet! We still need it for the next steps).
Step 2: OCLP-Mod
Now we can finally open OCLP-Mod. Unfortunately, the whole app is in Chinese (I used Google Translate), but you can follow along with the screenshots attached below.
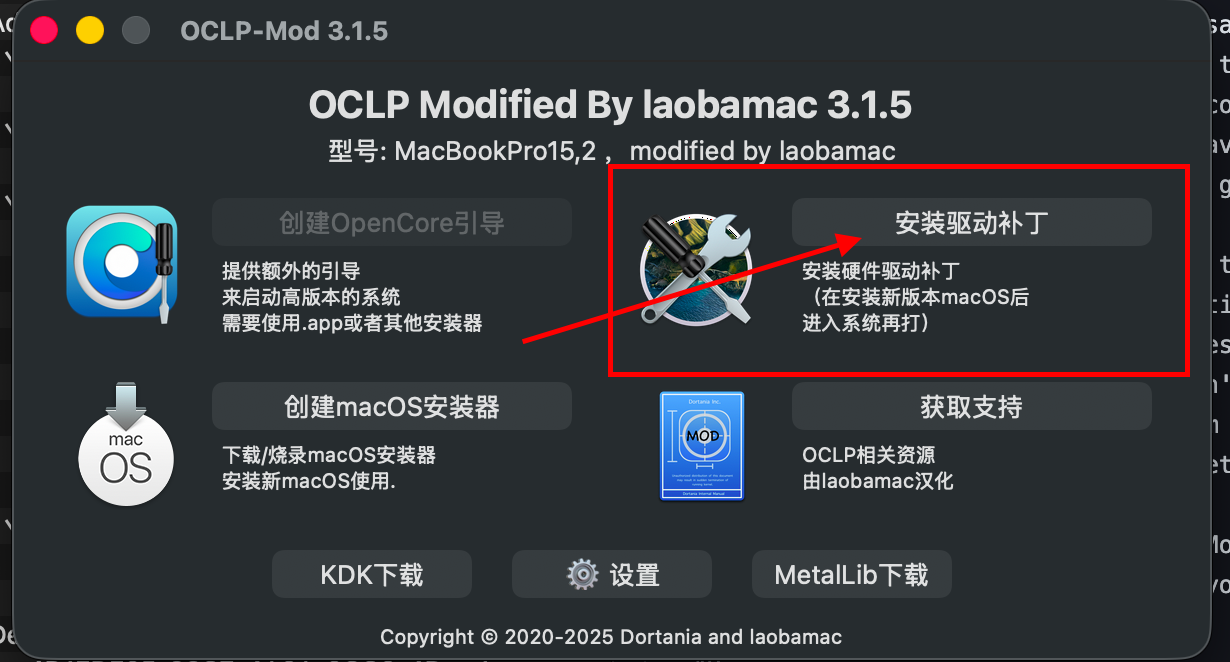
First, you want to make sure you did everything correctly so far. Clicking the first button will show you if you can apply patches or not.
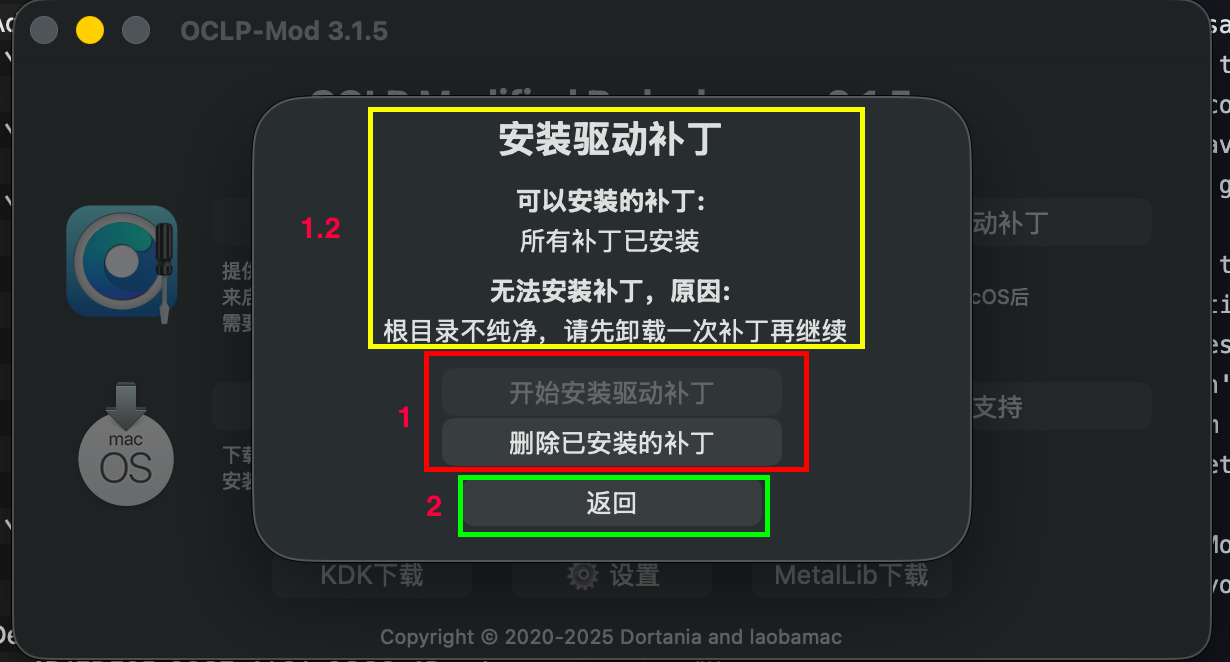
- Red Square (1): If these two buttons are active, you’re good. (Mine has the first one greyed out because I’ve already patched my system).
- Yellow Square (1.2): Tells you what patches are available for your system and/or the reason(s) why you can’t patch yet (e.g., SIP is enabled).
- Green Square (2): The Back button.
Edit: I reopned OCLP-Mod from another laptop so that I can add a screenshot where the button it’s not greyed out.
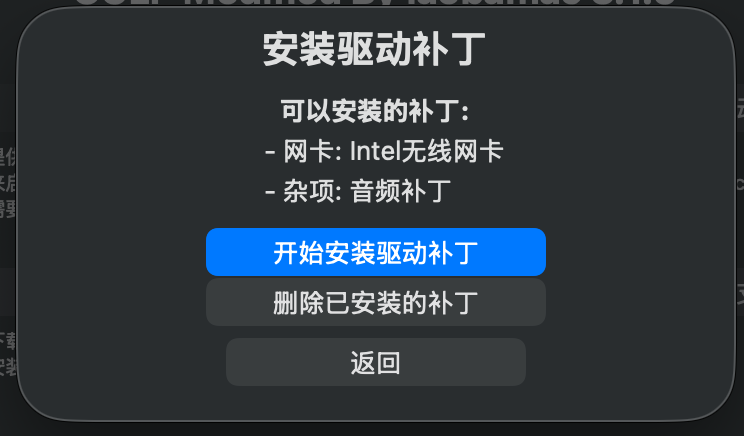
Step 3: Download and Install KDK
If your buttons are working, go back and click the KDK button in the bottom left corner.
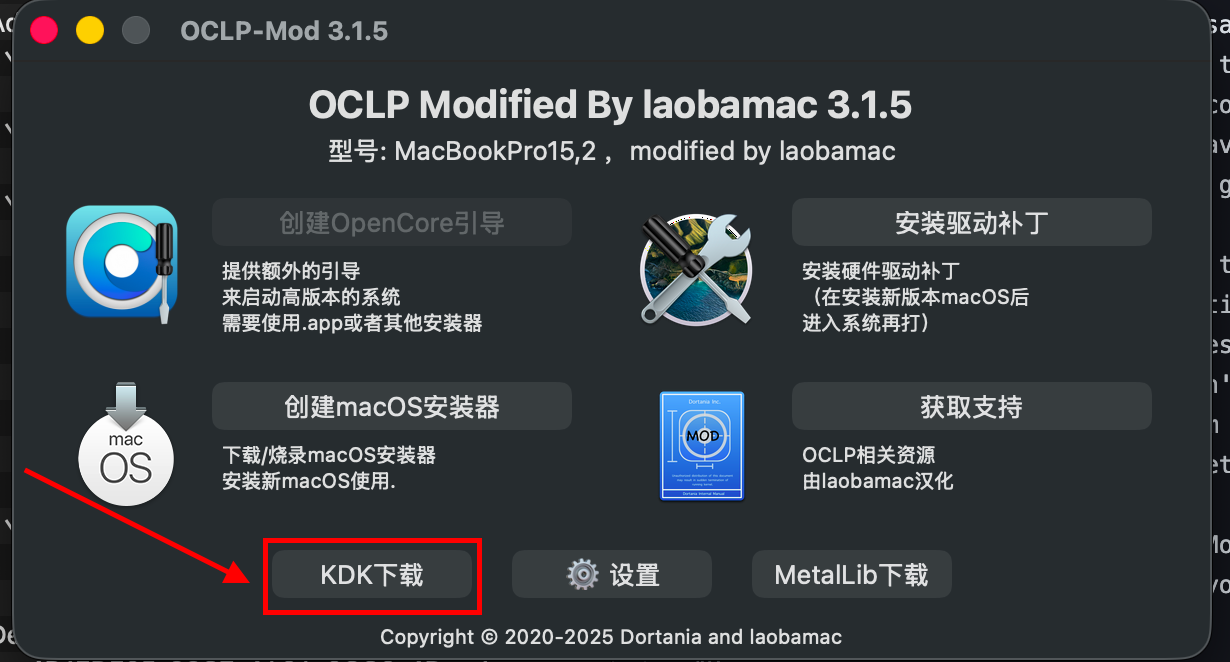
You will see this page:
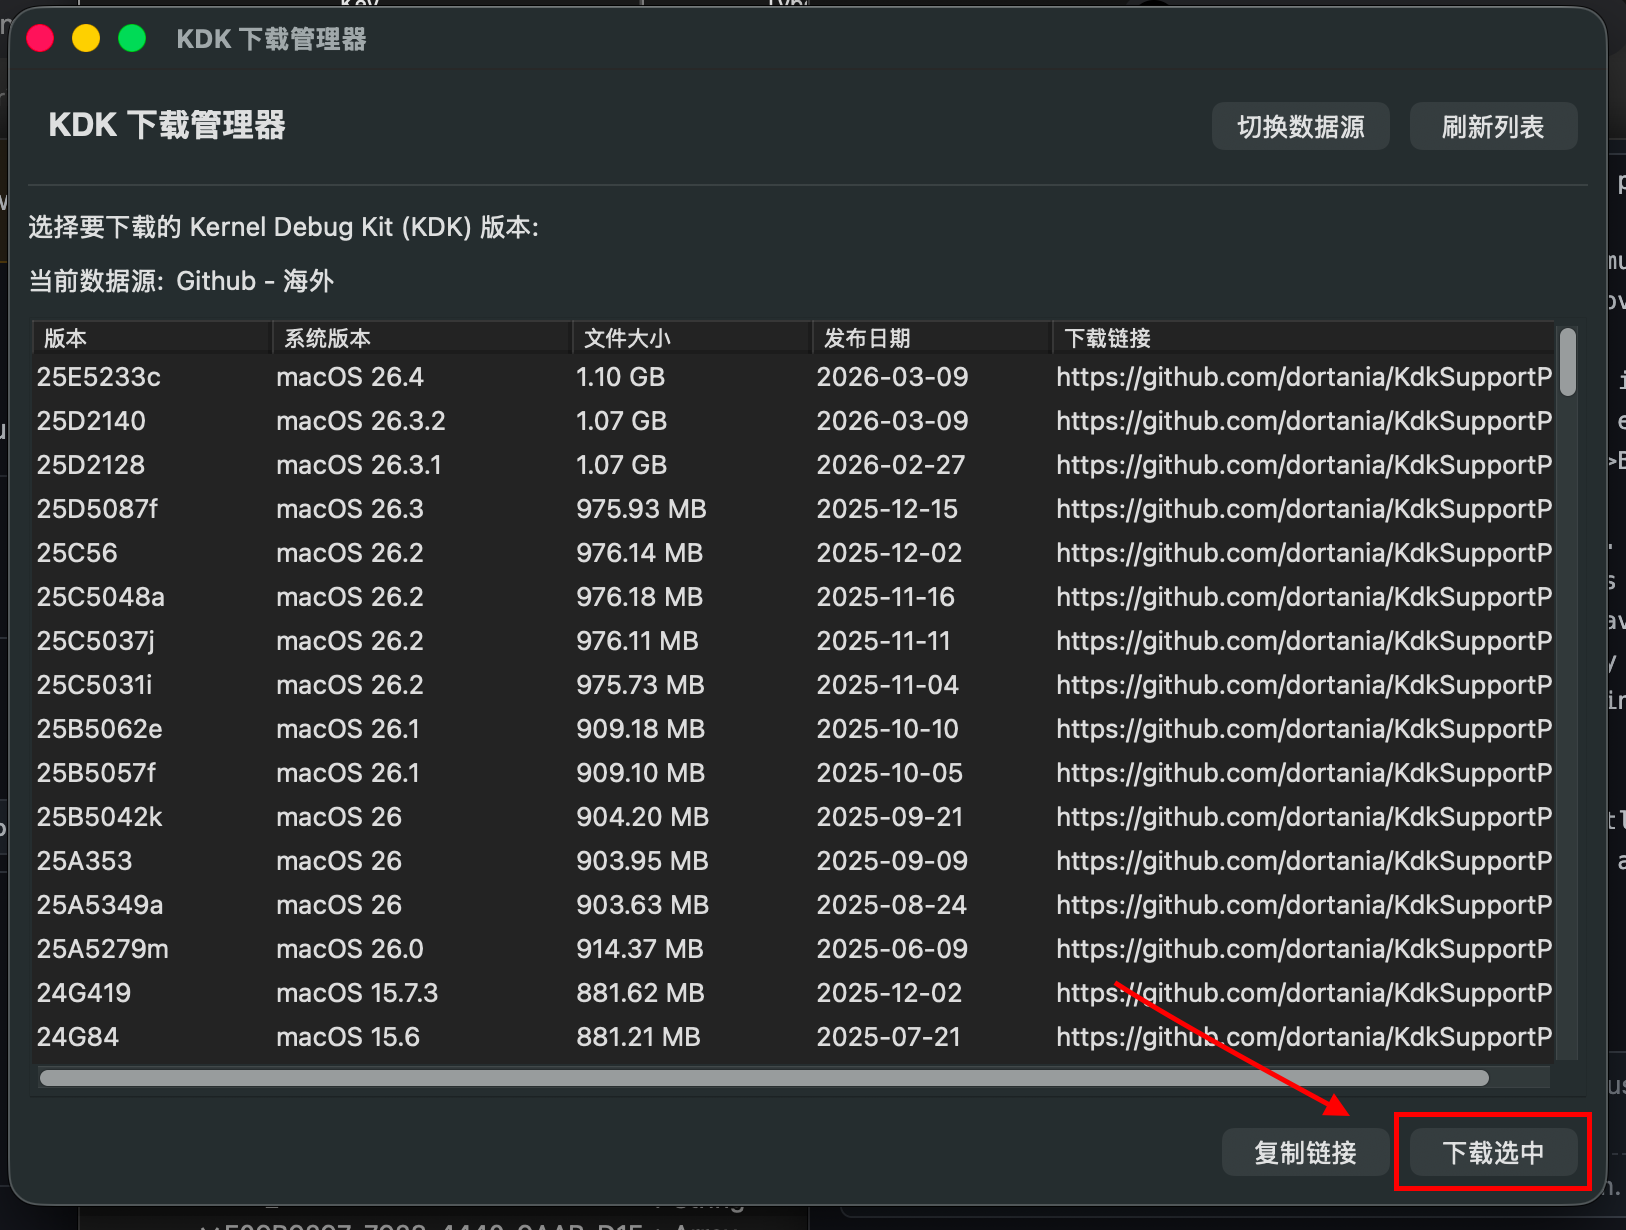
- Choose the matching macOS 26 version (I tested 26.3.1).
- Click the button on the bottom right, as shown.
- It will ask you where you want to download the KDK. You can choose any location.
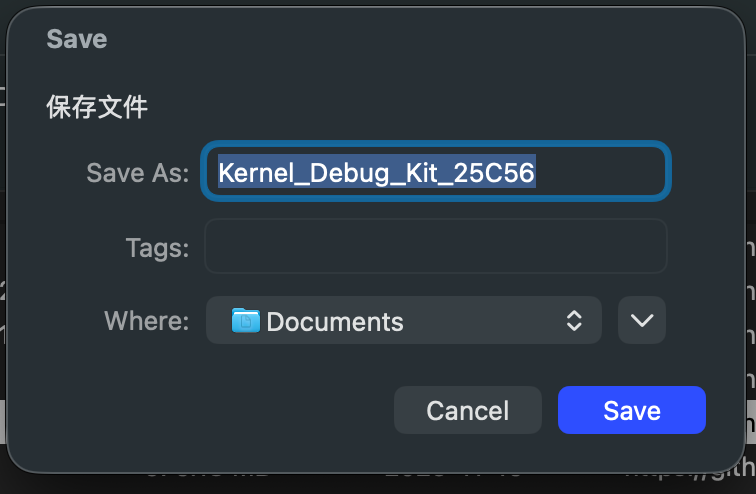
Wait for the download to finish.
Once done, close the KDK window(s) and go to the directory you chose earlier. Open the downloaded .dmg and install the .pkg inside.
Step 4: Apply Patches
When the KDK finishes installing, head back to the main page of OCLP-Mod and click the first button again.
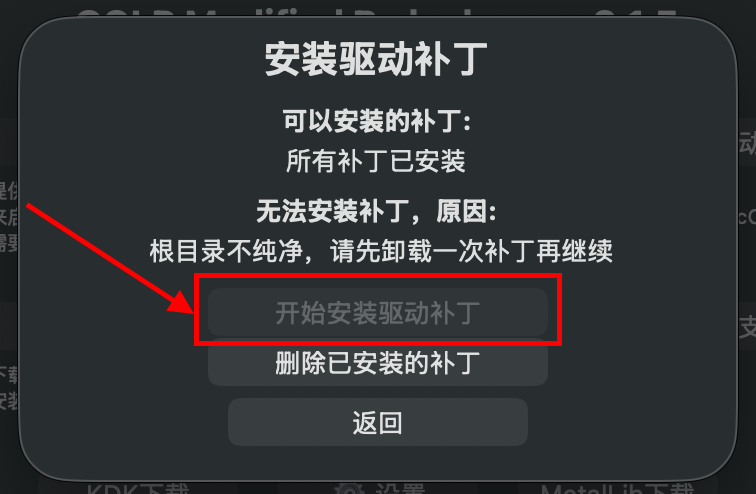
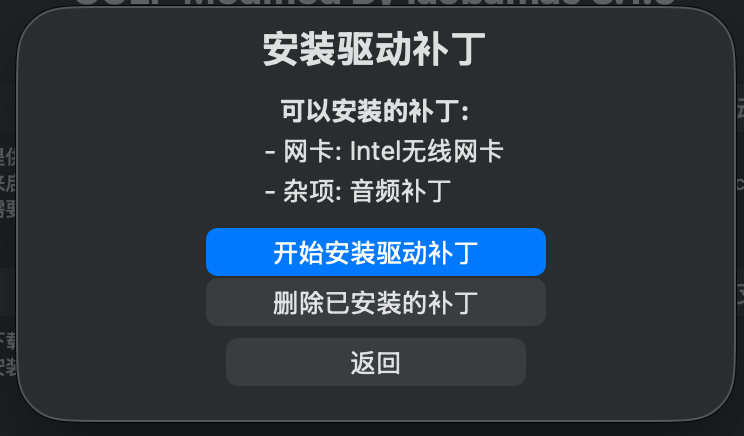
Proceed with installing the patches by clicking the first button

and then the first button again, in blue.
Step 5: Clean Up and Reboot
When it finishes, a pop-up will show up asking you to reboot the system (it’s the blue button in the bottom right corner).
STOP! BEFORE YOU REBOOT:
If you were using a temporary kext (like itlwm) to get internet access, now is the time to disable it in your config.plist. (You can just disable the entry rather than deleting the kext entirely, just in case the patch goes wrong and you need internet again). Save the config.plist.
- Now, click the button to reboot.
- Crucial Step: When you arrive at the OpenCore boot picker, you MUST Reset NVRAM so that macOS will load the changes properly. (If you can’t see the option because it’s hidden, press the
Space bar).
- The system will reboot again. Go ahead and test your WiFi, Bluetooth, and Audio!
If Bluetooth doesn’t work, the main culprit is usually the USB port mapping: check the system report in the USB section (or always in the USB section of Hackintool) to see if you see an entry for Bluetooth among the USB devices. If it isn’t there, you need to remap the USB ports.
P.S. If your computer has multiple bootloaders that have a tendency to overthrow OpenCore in the BIOS boot menu, remember to go into your BIOS and fix the boot order after resetting the NVRAM.
And that should be all! If something isn’t clear enough or maybe you need help with something, I can’t guarantee that I’ll be able to help, but I’ll be happy to try.
🏆 Credits, Guides, Inspiration, and Recommended Software
A huge thank you to the developers and the community. This wouldn’t be possible without:


评论