

HASmartThermostat
Smart Thermostat with PID controller for Home Assistant
Create a virtual thermostat with accurate and reactive temperature control through PID controller.
Principle of the PID controller.
Any heater or air conditioner unit with ON/OFF switch or pilot wire can be controlled using a pulse
width modulation that depends on the temperature error and its variation over time.

Installation:
I recommend using HACS for easier installation.
Install using HACS:
Go to HACS, select Integrations, click the three dots menu and select
“Custom repositories”. Add the path to the Github repository in the first field, select Integration
as category and click Add. Once back in integrations panel, click the Install button on the Smart
Thermostat PID card to install.
After installation, add the integration from Settings → Devices & Services → Add Integration and
search for Smart thermostat.
Manual installation:
- Go to default /homeassistant/.homeassistant/ (it’s where your configuration.yaml is)
- Create /custom_components/ directory if it does not already exist
- Copy the smart_thermostat folder into /custom_components/
- Set up the smart_thermostat and have fun
Configuration:
- Open Settings → Devices & Services → Add Integration
- Search for Smart thermostat
- Follow the setup wizard to select your temperature sensor, heater/cooler actuators, and PID settings
- Adjust settings later via Configure on the integration card
Manual YAML configuration:
The smart thermostat can also be added by adding a climate section to your configuration.yaml file.
Configuration examples:
configuration.yaml
climate:
  - platform: smart_thermostat
    name: Smart Thermostat Single ON/OFF Heater Example
    unique_id: smart_thermostat_single_on_off_heat_example
    heater: switch.on_off_heater
    target_sensor: sensor.ambient_temperature
    min_temp: 7
    max_temp: 28
    ac_mode: False
    target_temp: 19
    keep_alive:
      seconds: 60
    away_temp: 14
    kp: 50
    ki: 0.01
    kd: 2000
    pwm: 00:15:00
climate:
  - platform: smart_thermostat
    name: Smart Thermostat Multiple Valves Example
    unique_id: smart_thermostat_m_valve_example
    heater:
      - valve.radiator_valve_1
      - valve.radiator_valve_2
      - valve.radiator_valve_3
    target_sensor: sensor.ambient_temperature
    min_temp: 7
    max_temp: 28
    ac_mode: False
    target_temp: 19
    keep_alive:
      seconds: 60
    away_temp: 14
    kp: 5
    ki: 0.01
    kd: 500
    output_min: 0
    output_max: 99
    pwm: 0
climate:
  - platform: smart_thermostat
    name: Smart Thermostat Cascading PID Example
    unique_id: smart_thermostat_outer_pid_example
    heater: climate.smart_thermostat_single_on_off_heat_example
    target_sensor: sensor.ambient_temperature2
    min_temp: 7
    max_temp: 28
    ac_mode: False
    target_temp: 19
    keep_alive:
      seconds: 60
    away_temp: 14
    kp: 5
    ki: 0.01
    kd: 500
    output_min: 7
    output_max: 28
    pwm: 0
Usage:
The target sensor measures the ambient temperature while the heater switch controls an ON/OFF
heating system.
The PID controller computes the amount of time the heater should remain ON over the PWM period to
reach the temperature set point, in example with PWM set to 15 minutes, if output is 100% the
heater will be kept on for the next 15 minutes PWM period. If PID output is 33%, the heater will be
switched ON for 5 minutes only.
By default, the PID controller will be called each time the target sensor is updated. When using
main powered sensor with high sampling rate, the sampling_period parameter should be used to slow
down the PID controller refresh rate.
By adjusting the Kp, Ki and Kd gains, you can tune the system response to your liking. You can find
many tutorials for guidance on the web. Here are a few useful links:
To make it quick and simple:
- Kp gain adjusts the proportional part of the error compensation. Higher values means
stronger reaction to error. Increase the value for faster rise time.
- Ki gain adjusts the integral part. Integral compensates the residual error when temperature
settles in a cumulative way. The longer the temperature remains below the set point, the higher the
integral compensation will be. If your system settles below the set point, increase the Ki value.
If it settles over the set point, decrease the Ki value.
- Kd gain adjusts the derivative part of the compensation. Derivative compensates the inertia of
the system. If the sensor temperature increases quickly between two samples, the PID will decrease
the PWM level accordingly to limit the overshoot.
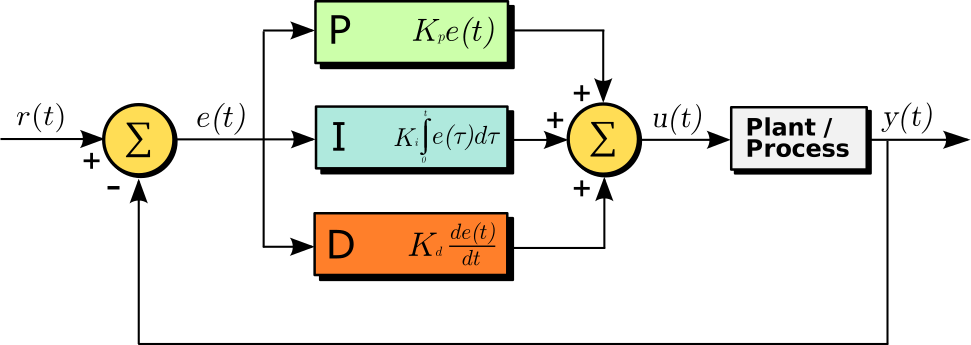
PID output value is the weighted sum of the control terms:
error = target_temp - current_temperature
di = temperature change between last two samples
dt = time elapsed between last two samples
P = Kp * error
I = last_I + (Ki * error * dt)
D = -(Kd * di) / dt
output = P + I + D
Output is then limited to 0% to 100% range to control the PWM.
Outdoor temperature compensation
Optionally, when an outdoor temperature sensor entity is provided and ke is set, the thermostat can
automatically compensate building losses based on the difference between target temperature and
outdoor temperature. An external component E is added to the PID output:
E = Ke * (target_temp - outdoor_temp)
output = P + I + D + E
Output is then limited to 0% to 100% range to control the PWM.
The Ke gain depends on the insulation of the building, on recent buildings with good insulation, a
gain of 0.6 is recommended. This compensation will act like the integral of the PID, but with
faster response time, so the integral will be more stable.
Cascading PID
Optionally, 2 (or more) PIDs can be used in a cascading manner, e.g. for underfloor heating define an outer
PID between the room temperature and the floor temperature, and an inner PID between the floor
temperature and the PWM. That way can avoid overheating the floor. See details here.
For the example mentioned above, first measure the effect of turning the underfloor heating on and off again
on the floor temperature. Use that as input for PID Tuner, and create a
Smart Thermostat (with “inner” in its name and unique_id). Set the min_temp and max_temp to farthest
acceptable values.
Next, measure the effect on the room temperature of turning the new inner thermostat to the highest
temperature and then turning it off again. Feed that into PID Tuner, and create the main Smart Thermostat,
with the unique_id of the inner thermostat as the heater. The sampling_period and min_cycle_duration
should be higher for the outer thermostat, and naturally its pwm should be 0.
See here a full example:
climate:
  - platform: smart_thermostat
    name: "Bedroom Underfloor Heating Thermostat"
    unique_id: bedroom_underfloor_heating_thermostat
    heater: climate.bedroom_underfloor_heating_inner_thermostat
    target_sensor: sensor.bedroom_room_temperature
    min_temp: 7
    max_temp: 28
    output_min: 7
    output_max: 28
    out_clamp_low: 7
    out_clamp_high: 28
    ac_mode: False
    target_temp: 23
    keep_alive:
      seconds: 60
    sampling_period: 600
    min_cycle_duration: 50
    force_off_state: false
    kp: 19.4
    ki: 0.005
    kd: 0
    pwm: 0

  - platform: smart_thermostat
    name: "Bedroom Underfloor Heating Inner Thermostat"
    unique_id: bedroom_underfloor_heating_inner_thermostat
    heater: switch.bedroom_heating
    target_sensor: sensor.bedroom_floor_temperature
    min_temp: 7
    max_temp: 28
    ac_mode: False
    target_temp: 23
    keep_alive:
      seconds: 60
    sampling_period: 120
    min_cycle_duration: 10
    kp: 2.06
    ki: 0.001
    kd: 0
    pwm: 00:15:00
Autotune (not always working, not recommended to use):
You can use the autotune feature to find some working PID parameters.
Add the autotune: parameter with the desired tuning rule, and optionally set the noiseband and
lookback duration if the default 2 hours doesn’t match your HVAC system bandwidth.
Restart Home Assistant to start the thermostat in autotune mode and set the desired temperature on
the thermostat. The autotuner will then start analyzing your heating system, measure the sampling
rate of the sensor, control the heater switch and monitor the temperature changes.
Wait for the autotune to finish by checking the autotune_status attribute for success. The Kp, Ki
and Kd gains will then be computed and set according to the selected rule and the thermostat
switches to PID.
The Kp, Ki and Kd gains are also computed using the other rules, and all values are shown in the
Home Assistant log like this: “Smart thermostat PID Autotuner output with ziegler-nichols rule:
Kp=######, Ki=######, Kd=######”.
You should then save for reference the gains computed by the autotuner for future testing.
Warning: The thermostat set point can’t be changed once the autotuner has started monitoring
the temperature. The temperature regulation will work as a basic hysteresis thermostat based on set
point and noise band. If your heating system and temperature monitoring is slow, reducing the noise
band will reduce the temperature oscillations around the set point. If the sampling rate of your
temperature sensor is too fast (few seconds) or noisy (frequent temperature changes) increase the
noise band for system stability.
Warning: The autotuner result is saved in the entity attributes and restored after Home
Assistant is restarted.
However, it is recommended to save the new gains in the YAML configuration file to keep it in case
of Home Assistant database’s is corrupted.
Services
Services can be used in Home Assistant to configure the thermostat.
The following services are available:
Set PID gains: smart_thermostat.set_pid_gain
Use this service to adjust the PID gains without requiring a restart of Home
Assistant. Values are saved to Home Assistant database and restored after a restart.
Please consider saving the final gain parameters in YAML configuration file when satisfied to keep
it safe in case of database corruption.
Optional parameters : kp, ki and kd, as float.
Example:
service: smart_thermostat.set_pid_gain
data:
  kp: 11.8
  ki: 0.00878
target:
  entity_id: climate.smart_thermostat_example
Set PID mode: smart_thermostat.set_pid_mode
Use this service to set the PID mode to either ‘auto’ or ‘off’.
When in auto, the PID will modulate the heating based on temperature value and variation. When in
off, the PID output will be 0% if temperature is above the set point, and 100% if temperature is
below the set point.
Mode is saved to Home Assistant database and restored after a restart.
Required parameter : mode as a string in [‘auto’, ‘off’].
Example:
service: smart_thermostat.set_pid_mode
data:
  mode: 'off'
target:
  entity_id: climate.smart_thermostat_example
Set preset modes temperatures: smart_thermostat.set_preset_temp
Use this service to set the temperatures for the preset modes. It can be adjusted
for all preset modes, if a preset mode is not enabled through YAML, it will be enabled. You can use
any preset temp parameter available in smart thermostat settings.
Please note the value will then be saved in the entity’s state in database and restored after
restarting Home Assistant, ignoring values in YAML. Use the disable options to remove active
presets.
Example:
service: smart_thermostat.set_preset_temp
data:
  away_temp: 14.6
  boost_temp: 22.5
  home_temp_disable: true
target:
  entity_id: climate.smart_thermostat_example
Clear the integral part: smart_thermostat.clear_integral
Use this service to reset the integral part of the PID controller to 0. Useful when tuning the PID
gains to quickly test the behavior without waiting the integral to stabilize by itself.
Parameters:
- name (Optional): Name of the thermostat.
- unique_id (Optional): unique entity_id for the smart thermostat (required when cascading thermostats).
- heater (Optional): entity_id for heater control, should be a single or list of toggle
device (switch or input_boolean), light or valve (light, number, input_number). If a valve
or a light entity is used, pwm parameter should be set to 0. Becomes air conditioning switch
when ac_mode is set to true.
If you have e.g. multiple radiators in one room, you can enter all of them in a list, and the
thermostat will apply the output value to each of them.
If neither heater nor cooler is specified, the thermostat will not operate and remain stuck in OFF mode.
- cooler (Optional): entity_id for cooling control, should be a single or list of toggle
device (switch or input_boolean), light or valve (light, number, input_number). If a valve
or a light is used, pwm parameter should be set to 0.
If you have e.g. multiple coolers in one room, you can enter all of them in a list, and the
thermostat will apply the output value to each of them.
If both heater and cooler are specified, the thermostat will allow switching between heating and cooling mode.
If neither heater nor cooler is specified, the thermostat will not operate and remain stuck in OFF mode.
- invert_heater (Optional): if set to true, inverts the polarity of heater switch (switch is on
while idle and off while active). Must be a boolean (defaults to false).
- target_sensor (Required): entity_id for a temperature sensor, target_sensor.state must be
temperature.
- outdoor_sensor (Optional): entity_id for an outdoor temperature sensor, outdoor_sensor.state
must be temperature.
- keep_alive (Required): sets update interval for the PWM pulse width. If interval is too big,
the PWM granularity will be reduced, leading to lower accuracy of temperature control, can be float
in seconds, or time hh:mm:ss.
- kp (Recommended): Set PID parameter, proportional (p) control value (float, default 100). Note: Once the
thermostat has been created, changing the configuration PID values will not
update the PID controller. Use the
smart_thermostat.set_pid_gain service to update the PID
values instead.
- ki (Recommended): Set PID parameter, integral (i) control value (float, default 0).
- kd (Recommended): Set PID parameter, derivative (d) control value (float, default 0).
- ke (Optional): Set outdoor temperature compensation gain (e) control value (float, default 0).
- pwm (Required): Set period of the pulse width modulation. If too long, the response time of
the thermostat will be too slow, leading to lower accuracy of temperature control. Can be float in
seconds or time hh:mm:ss (default 15mn). Set it to 0 only when using heater entity with “analog” input
values (for example 0/100%) like valves or lights. Do not set it to 0 when using binary entity with
ON/OFF states.
- min_cycle_duration (Optional): Set a minimum amount of time that the switch specified in the
heater option must be in its current state prior to being switched either off or on (useful to
protect boilers). Can be float in seconds or time hh:mm:ss (default 0s).
- min_off_cycle_duration (Optional): When
min_cycle_duration is specified, Set a minimum
amount of time that the switch specified in the heater option must remain in OFF state prior to
being switched ON. The min_cycle_duration setting is then used for ON cycle only, allowing
different minimum cycle time for ON and OFF. Can be float in seconds or time hh:mm:ss (defaults to
min_cycle_duration value).
- min_cycle_duration_pid_off (Optional): This parameter is the same as
min_cycle_duration but is
used specifically when PID is set to OFF. Defaults to min_cycle_duration value.
- min_off_cycle_duration_pid_off (Optional): This parameter is the same as
min_off_cycle_duration but is used specifically when PID is set to OFF. Defaults to
min_cycle_duration_pid_off value.
- sampling_period (Optional): interval between two computation of the PID. If set to 0, PID
computation is called each time the temperature sensor sends an update. Can be float in seconds or
time hh:mm:ss (default 0).
- target_temp_step (Optional): the adjustment step of target temperature (valid are 0.1, 0.5
and 1.0, default 0.5 for Celsius and 1.0 for Fahrenheit).
- precision (Optional): the displayed temperature precision (valid are 0.1, 0.5 and 1.0,
default 0.1 for Celsius and 1.0 for Fahrenheit).
- min_temp (Optional): Set minimum set point available (default: 7).
- max_temp (Optional): Set maximum set point available (default: 35).
- target_temp (Optional): Set initial target temperature. If not set target temperature will be
set to null on startup.
- cold_tolerance (Optional): When PID is off, set a minimum amount of difference between the
temperature read by the sensor specified in the target_sensor option and the target temperature
that must change prior to being switched on. For example, if the target temperature is 25 and the
tolerance is 0.5 the heater will start when the sensor equals or goes below 24.5 (float, default
0.3).
- hot_tolerance (Optional): When PID is off, set a minimum amount of difference between the
temperature read by the sensor specified in the target_sensor option and the target temperature
that must change prior to being switched off. For example, if the target temperature is 25 and the
tolerance is 0.5 the heater will stop when the sensor equals or goes above 25.5 (float, default
0.3).
- ac_mode (Optional): Set the switch specified in the heater option to be treated as a
heating/cooling device instead of a pure heating device. Should be a boolean (default: false).
- force_off_state (Optional): If set to true (default value), Home Assistant will force the
heater entity to OFF state when the thermostat is in OFF. Set parameter to false to control the
heater entity externally while the thermostat is OFF.
- preset_sync_mode (Optional): If set to sync mode, manually setting a temperature will enable
the corresponding preset. In example, if away temperature is set to 14°C, manually setting the
temperature to 14°C on the thermostat will automatically enable the away preset mode. Should be
a string, either ‘sync’ or ‘none’ (default: ‘none’).
- boost_pid_off (Optional): When set to true, the PID will be set to OFF state while boost
preset is selected, and the thermostat will operate in hysteresis mode. This helps to quickly raise
the temperature in a room for a short period of time. Should be a boolean (default: false).
- away_temp (Optional): Set the default temperature used by the “Away” preset. If this is not
specified, away_mode feature will not be available. The temperature can then be adjusted using the
set_preset_temp service, new value being restored after restarting HA.
- eco_temp (Optional): Set the default temperature used by the “Eco” preset. If this is not
specified, eco feature will not be available. The temperature can then be adjusted using the
set_preset_temp service, new value being restored after restarting HA.
- boost_temp (Optional): Set the default temperature used by the “Boost” preset. If this is not
specified, boost feature will not be available. The temperature can then be adjusted using the
set_preset_temp service, new value being restored after restarting HA.
- comfort_temp (Optional): Set the default temperature used by the “Comfort” preset. If this is
not specified, comfort feature will not be available.
- home_temp (Optional): Set the default temperature used by the “Home” preset. If this is not
specified, home feature will not be available. The temperature can then be adjusted using the
set_preset_temp service, new value being restored after restarting HA.
- sleep_temp (Optional): Set the default temperature used by the “Sleep” preset. If this is not
specified, sleep feature will not be available. The temperature can then be adjusted using the
set_preset_temp service, new value being restored after restarting HA.
- activity_temp (Optional): Set the default temperature used by the “Activity” preset. If this
is not specified, activity feature will not be available. The temperature can then be adjusted using
the
set_preset_temp service, new value being restored after restarting HA.
- sensor_stall (Optional): Sets the maximum time period between two sensor updates. If no
update received from sensor after this time period, the system considers the sensor as stall and
switch to safety mode, the output being forced to
output_safety. If set to 0, the feature is
disabled. Can be float in seconds or time hh:mm:ss (default 6 hours).
- output_safety (Optional): Sets the output level of the PID once the thermostat enters safety
mode due to unresponsive temperature sensor. This can help to keep a minimum temperature in the
room in case of sensor failure. The value should be a float between 0.0 and 100.0 (default 5.0).
- initial_hvac_mode (Optional): Forces the operation mode after Home Assistant is restarted. If
not specified, the thermostat will restore the previous operation mode.
- output_precision (Optional): Sets the precision (number of decimals) of the
control_output
value (default 1). This setting may be useful when driving a valve that takes integer values as
input for example, by setting the parameter to 0 to round the PID output to integers.
- output_min (Optional): Sets the minimum value for control output to match the heating
controller. In example, when controlling a valve, it may not accept a value of 0 as minimum, and 1
may be used instead (default 0).
- output_max (Optional): Sets the maximum value for control output to match the heating
controller. In example, when controlling a valve, it may not accept a value of 100 as maximum, and
99 may be used instead (default 100).
- out_clamp_low (Optional): Allows clamping the minimum value of control output. It allows to
keep a minimum heating whatever the temperature is (defaults to
output_min). Parameter accepts
either a float value or a unique ID string pointing to a valid numeric entity.
- out_clamp_high (Optional): Allows clamping the maximum value of control output. Can be used
with electric heating systems to limit the ON/OFF duty-cycle (defaults to
output_max). Parameter
accepts either a float value or a unique ID string pointing to a valid numeric entity.
- debug (Optional): Make the climate entity expose the following internal values as extra
states attributes, so they can be accessed in HA with sensor templates for debugging purposes (helpful to adjust the
PID gains). Here is an example of configuration.yaml:
template:
  - sensor:
    - name: "PID Output"
      unit_of_measurement: "%"
      state: "{{ state_attr('climate.smart_thermostat_example', 'control_output') | float(0) }}"

    - name: "PID P"
      unit_of_measurement: "%"
      state: "{{ state_attr('climate.smart_thermostat_example', 'pid_p') | float(0) }}"

    - name: "PID I"
      unit_of_measurement: "%"
      state: "{{ state_attr('climate.smart_thermostat_example', 'pid_i') | float(0) }}"

    - name: "PID D"
      unit_of_measurement: "%"
      state: "{{ state_attr('climate.smart_thermostat_example', 'pid_d') | float(0) }}"

    - name: "PID E"
      unit_of_measurement: "%"
      state: "{{ state_attr('climate.smart_thermostat_example', 'pid_e') | float(0) }}"
It is strongly recommended to disable the debug mode once the
PID Thermostat is working fine, as the added extra states attributes will fill the Home Assistant
database quickly.
Available debug attributes are:
pid_ppid_ipid_dpid_epid_dt
- noiseband (Optional): set noiseband for autotune (float): Determines by how much the input
value must overshoot/undershoot the set point before the state changes (default : 0.5).
- lookback (Optional): length of the autotune buffer for the signal analysis to detect peaks,
can be float in seconds, or time hh:mm:ss (default 2 hours).
- autotune (Optional): Set the name of the selected rule for autotune settings (ie
“ziegler-nichols”). If it’s not set, autotune is disabled. The following tuning_rules are available:
| rule |
Kp_divisor |
Ki_divisor |
Kd_divisor |
| “ziegler-nichols” |
34 |
40 |
160 |
| “tyreus-luyben” |
44 |
9 |
126 |
| “ciancone-marlin” |
66 |
88 |
162 |
| “pessen-integral” |
28 |
50 |
133 |
| “some-overshoot” |
60 |
40 |
60 |
| “no-overshoot” |
100 |
40 |
60 |
| “brewing” |
2.5 |
6 |
380 |
Credits
This code is a fork from Smart Thermostat PID project:
https://github.com/aendle/custom_components
The python PID module with Autotune is based on pid-autotune:
https://github.com/hirschmann/pid-autotune


评论